My findings on the impact of regularization images & captions in training a subject SDXL Lora with Dreambooth
I wanted to research the impact of regularization images and captions when training a Lora on a subject in Stable Diffusion XL 1.0 (SDXL 1.0) using Dreambooth. I used SDXL 1.0 with the baked 0.9 VAE throughout this experiment.
There’s a couple of things I wanted to find out with the resulting Lora’s:
- How capable is the model able to generate photos of me?
- How versatile is the model in generating non-photos of me (drawing, 3D cartoon, …)
- What’s the impact of my model when trying to render images which should not contain me? (aka: does my model leak into general classes such as the word “man”)
- How long does it take to train a Lora on a subject?
This post is a summary of my findings.
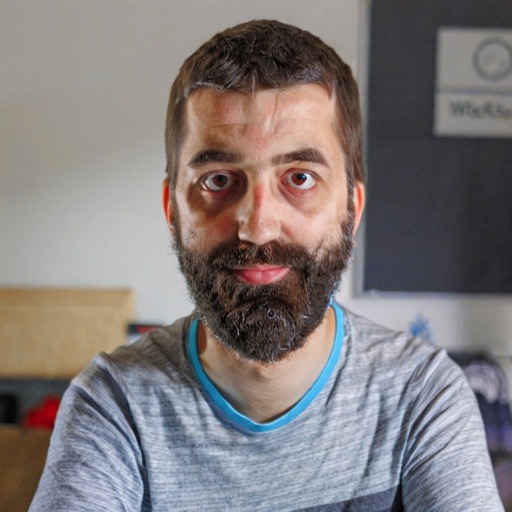
Input images
I have 47 input images, most of them close-up or half body. 3 full body shots.
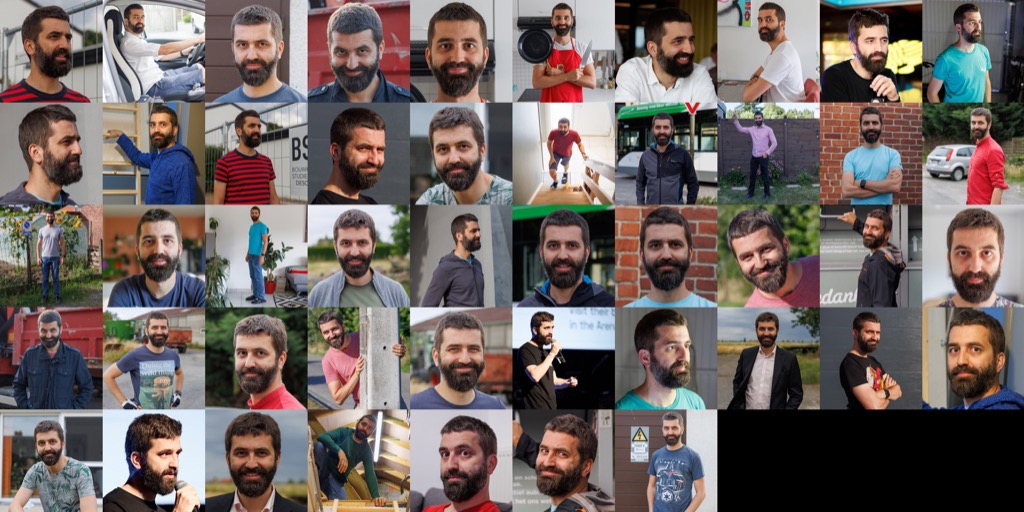
I described these images with captions like this, using a special keyword w0ut3r. I followed the Captioning Datasets for Training Purposes to create those captions:
w0ut3r, photo of a man, half body shot, from front, depth of field, looking into camera, standing, arms crossed, holding frying pan and kitchen knife, mouth closed, slightly smiling, white t - shirt, red apron, indoors, kitchen stove and knives in backgroundRegularization images
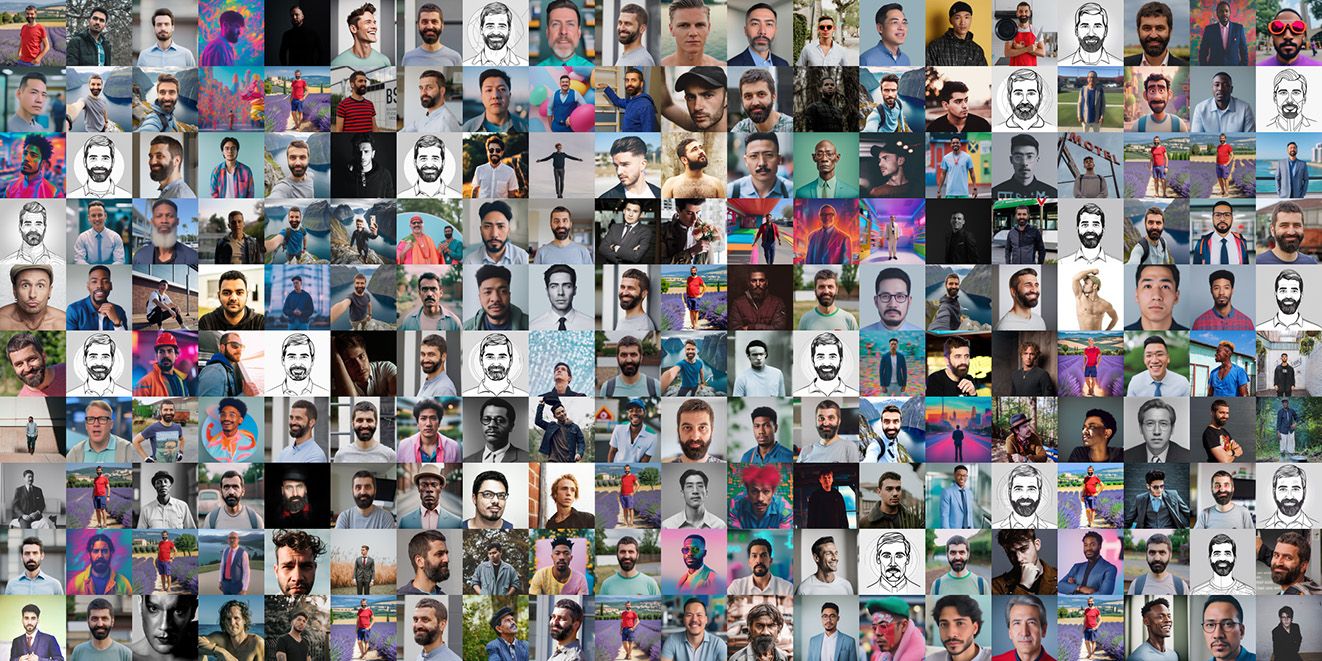
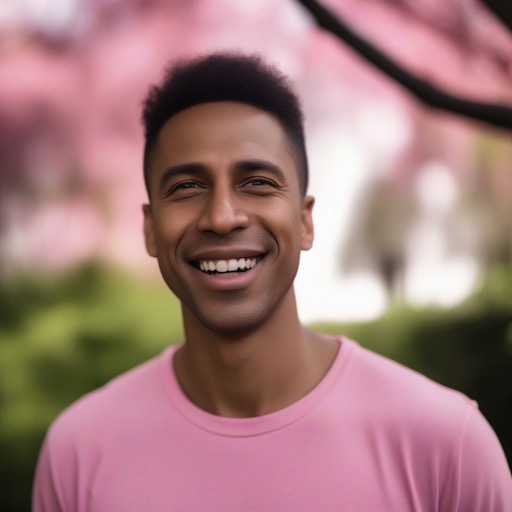
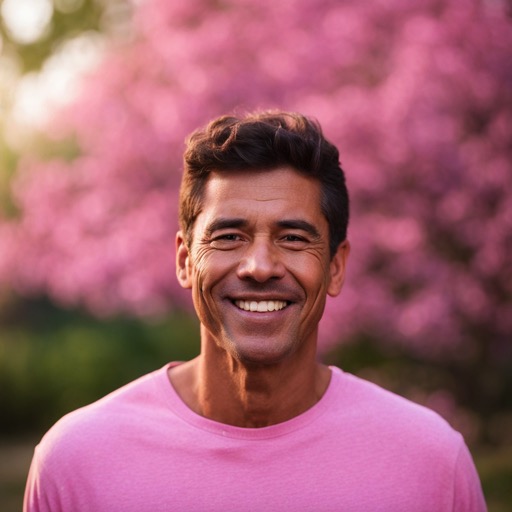
I’ve gathered 3 different sets regularization images, which I’ll use to train my Lora. The images below are just a sample, I have at least 500 images per set.


Training plan
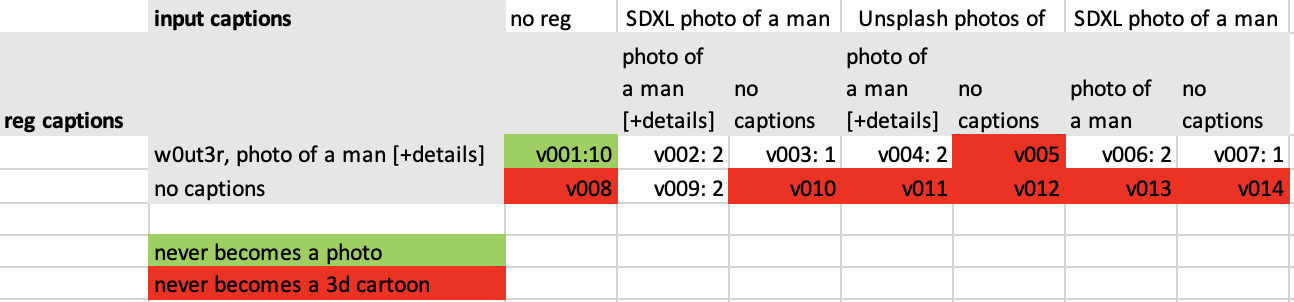
There’s quite a couple of combination of inputs (14), regularizations and captions possible, which I mapped out in this table. I gave each combination a version number, which I’ll use later on to refer to them.

First training: v002
I picked configuration v002 as my first attempt. I expected this version to give me good results.
This configuration has the following data:
- image folder name
9_w0ut3r man(used 9 repeats). - image folder has detailed captions like
w0ut3r, photo of a man [+extra details]. - there are regularization images in a folder called
1_man. These images were created with SDXL, with input prompts based upon the contents of my real images. - the regularization images have detailed captions, containing that prompt (e.g
photo of a man [+extra details]).
I used the following Kohya Google Colab to do my training: https://github.com/camenduru/kohya_ss-colab
In training the Lora, I was aiming for around 2000 steps, creating 10 snapshots during the process. When logging the training command, you can see how it calculates the number of steps:
INFO     Folder 9_w0ut3r man: 47 images found
INFO     Folder 9_w0ut3r man: 423 steps
INFO     Regularisation images are used...
         Will double the
         number of steps required...
INFO     Total steps: 423
INFO     Train batch size: 4
INFO     Gradient accumulation steps: 1.0
INFO     Epoch: 10
INFO     Regulatization factor: 2
INFO     max_train_steps (423 / 4 / 1.0 * 10 * 2) = 2115
Here are a few settings I used worth noting:
- learning_rate: 0.0004
- learning rate scheduler: cosine_with_restarts
- training batch size: 4
- 10 epochs
- save every epoch
- bf16 precision
- added the extra network_train_unet_only training command, as recommended in the Kohya_ss documentation for SDXL. The immidiate impact of this parameter I noticed, is that the resulting file is a bit smaller.
With my settings, the training command itself looked like this:
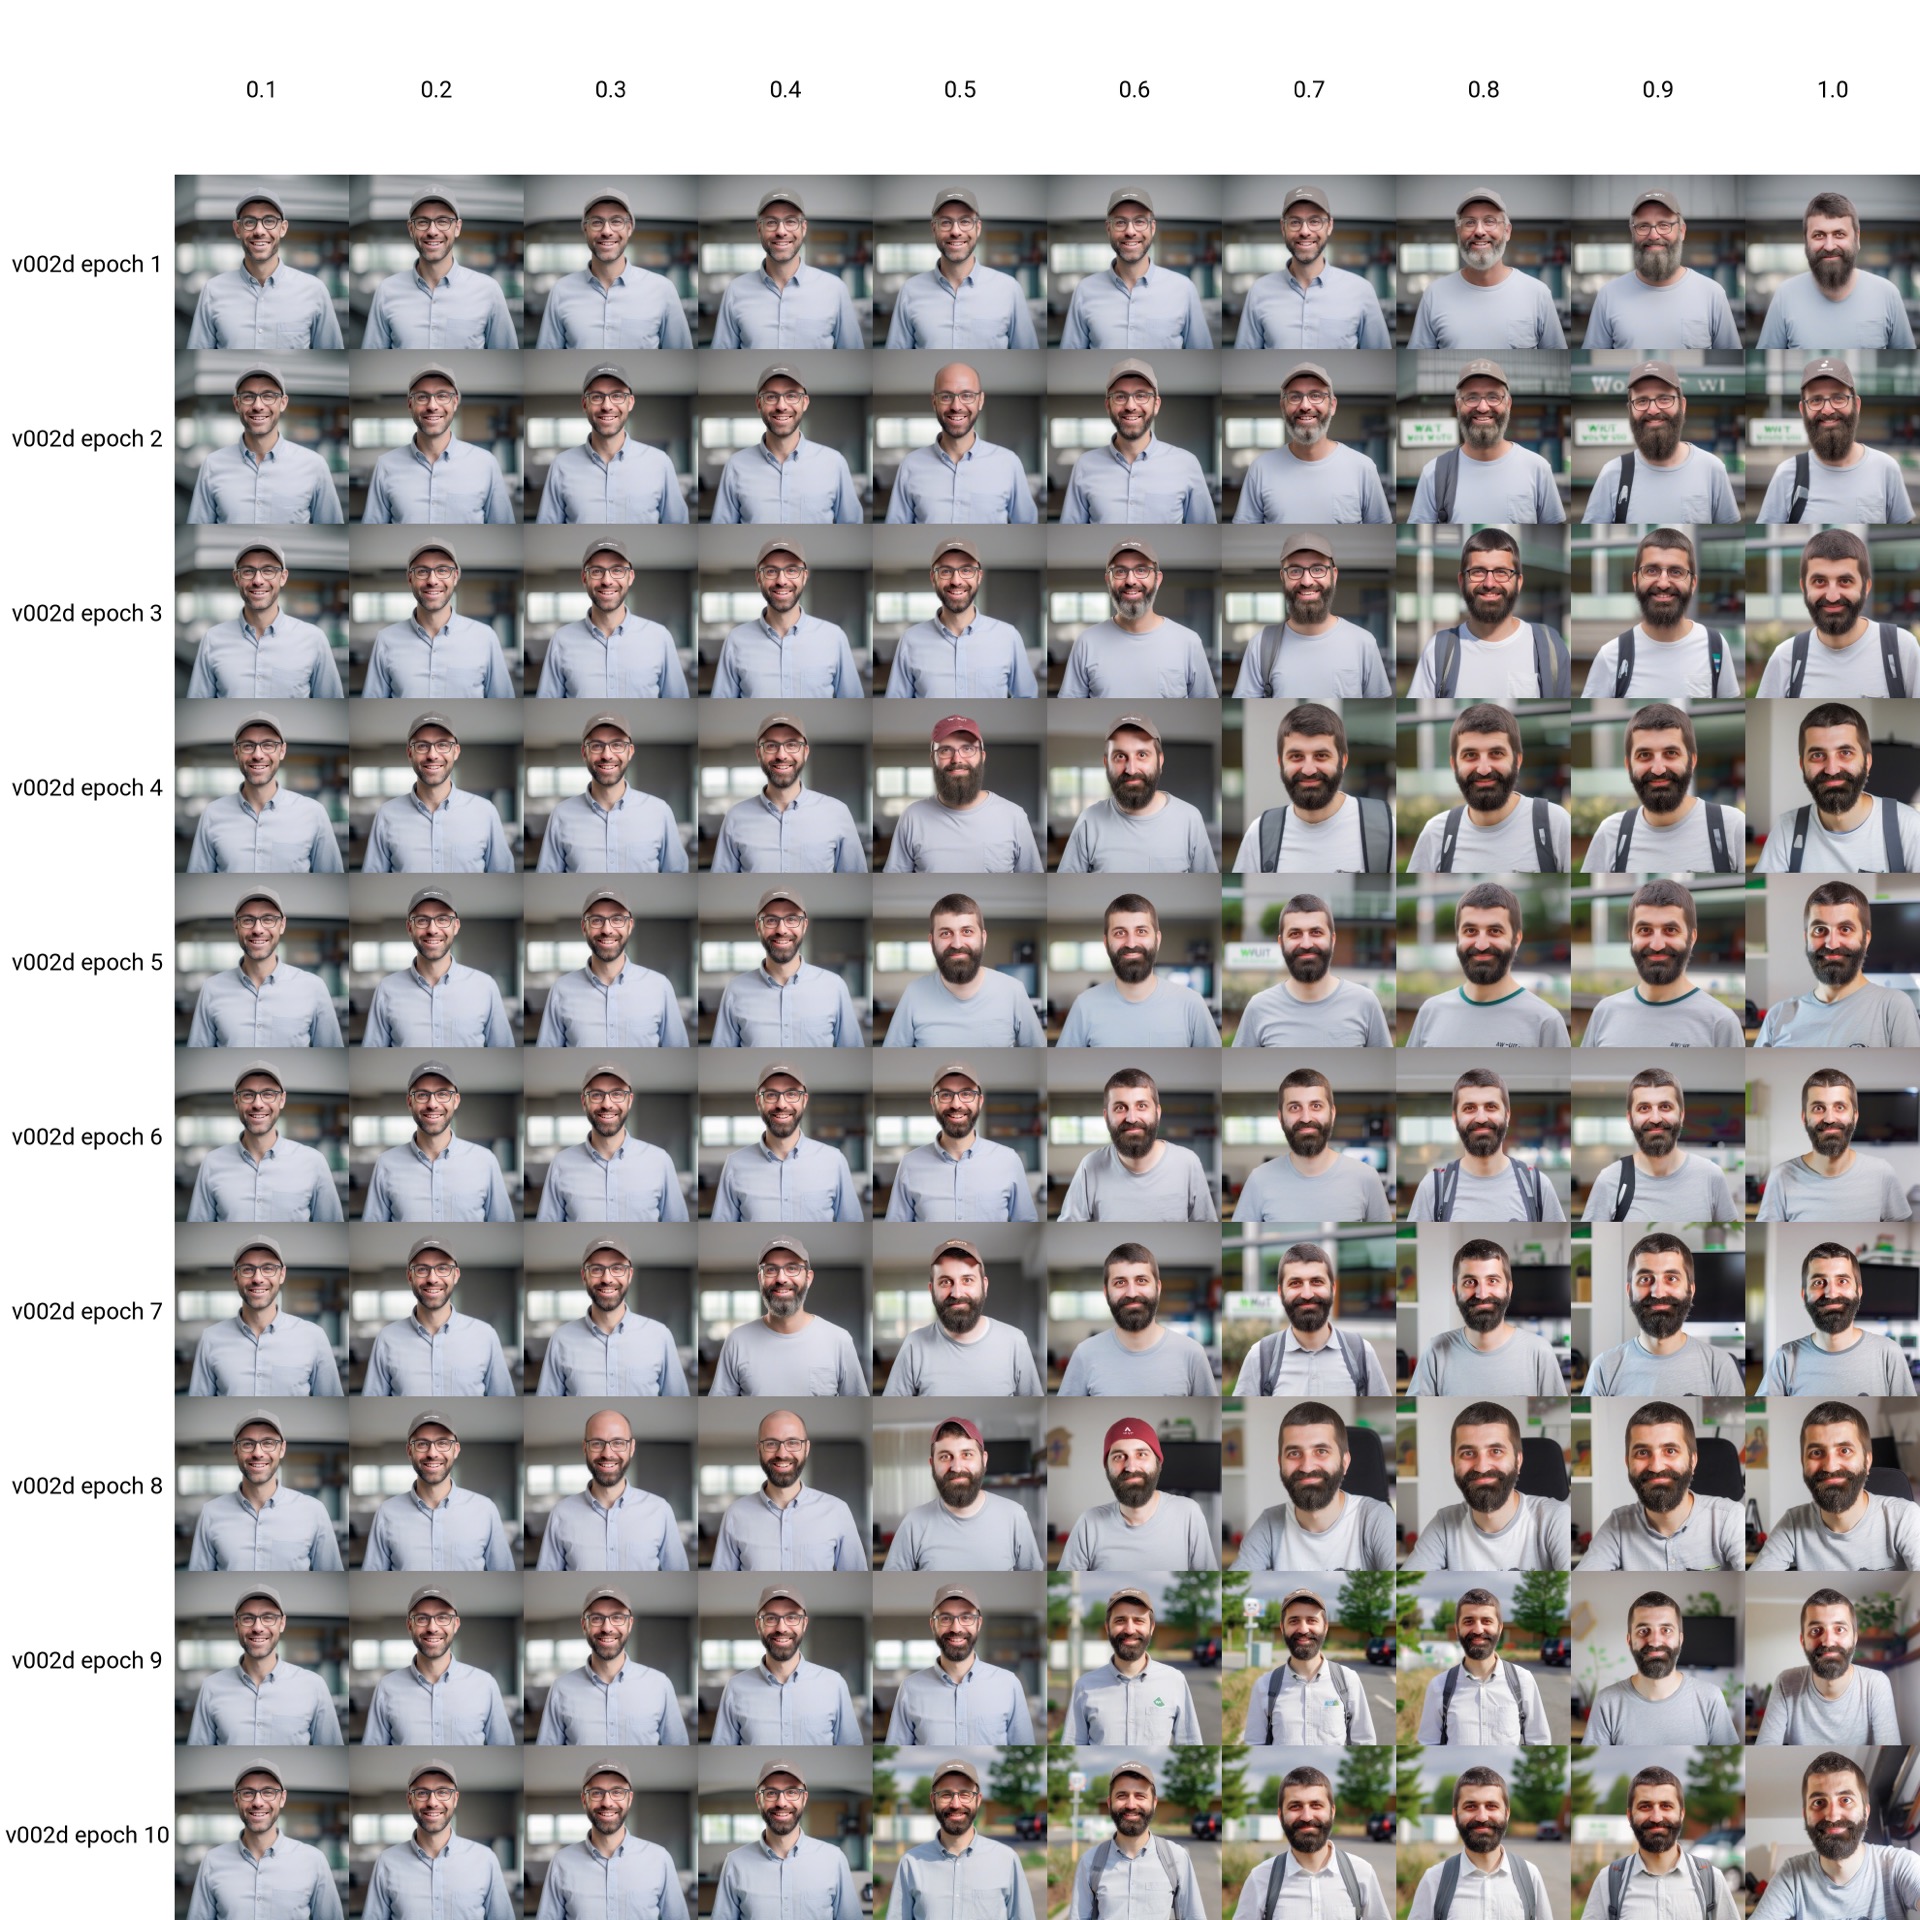
accelerate launch --num_cpu_threads_per_process=1 "./sdxl_train_network.py" --enable_bucket --pretrained_model_name_or_path="/content/drive/MyDrive/sd/stable-diffusion-webui/models/Stable-diffusion/sd_xl_base_1.0_0.9vae.safetensors" --train_data_dir="/content/drive/MyDrive/sd/_sdxl-training/v002/img" --reg_data_dir="/content/drive/MyDrive/sd/_sdxl-training/v002/reg" --resolution="1024,1024" --output_dir="/content/drive/MyDrive/sd/_sdxl-training/v002/model" --logging_dir="/content/drive/MyDrive/sd/_sdxl-training/v002/log" --network_alpha="1" --save_model_as=safetensors --network_module=networks.lora --text_encoder_lr=4e-05 --unet_lr=0.0004 --network_dim=128 --output_name="wouter_xl_1.0_v002" --lr_scheduler_num_cycles="10" --no_half_vae --learning_rate="0.0004" --lr_scheduler="cosine_with_restarts" --train_batch_size="4" --max_train_steps="2115" --save_every_n_epochs="1" --mixed_precision="bf16" --save_precision="bf16" --caption_extension="txt" --cache_latents --cache_latents_to_disk --optimizer_type="Adafactor" --optimizer_args scale_parameter=False relative_step=False warmup_init=False --max_data_loader_n_workers="0" --bucket_reso_steps=64 --gradient_checkpointing --xformers --bucket_no_upscale --network_train_unet_onlyI fired up the command, and after about an hour my Lora was ready, resulting in 10 checkpoints (1 for each epoch). Each checkpoint was about 650MB in size. I created an xy plot, where I plotted each checkpoint with a fixed prompt, where I varied the Lora strength from 0.1 to 1.0. I did not use the SDXL refiner, just the SDXL base model, as my Lora was trained on just the base model.
- Prompt:
photo of a w0ut3r man <lora:wouter_xl_1.0_v002-000001:0.1> - Seed: 156680208700286
- Sampler: dpmpp_2s_ancestral
- 20 steps
- Config scale: 7
- 1024x1024 resolution
- X Prompt S/R: :0.1,:0.2,:0.3,:0.4,:0.5,:0.6,:0.7,:0.8,:0.9,:1.0
- Y Prompt S/R: wouter_xl_1.0_v002-000001,wouter_xl_1.0_v002-000002,wouter_xl_1.0_v002-000003,wouter_xl_1.0_v002-000004,wouter_xl_1.0_v002-000005,wouter_xl_1.0_v002-000006,wouter_xl_1.0_v002-000007,wouter_xl_1.0_v002-000008,wouter_xl_1.0_v002-000009,wouter_xl_1.0_v002
This resulted in the following plot:
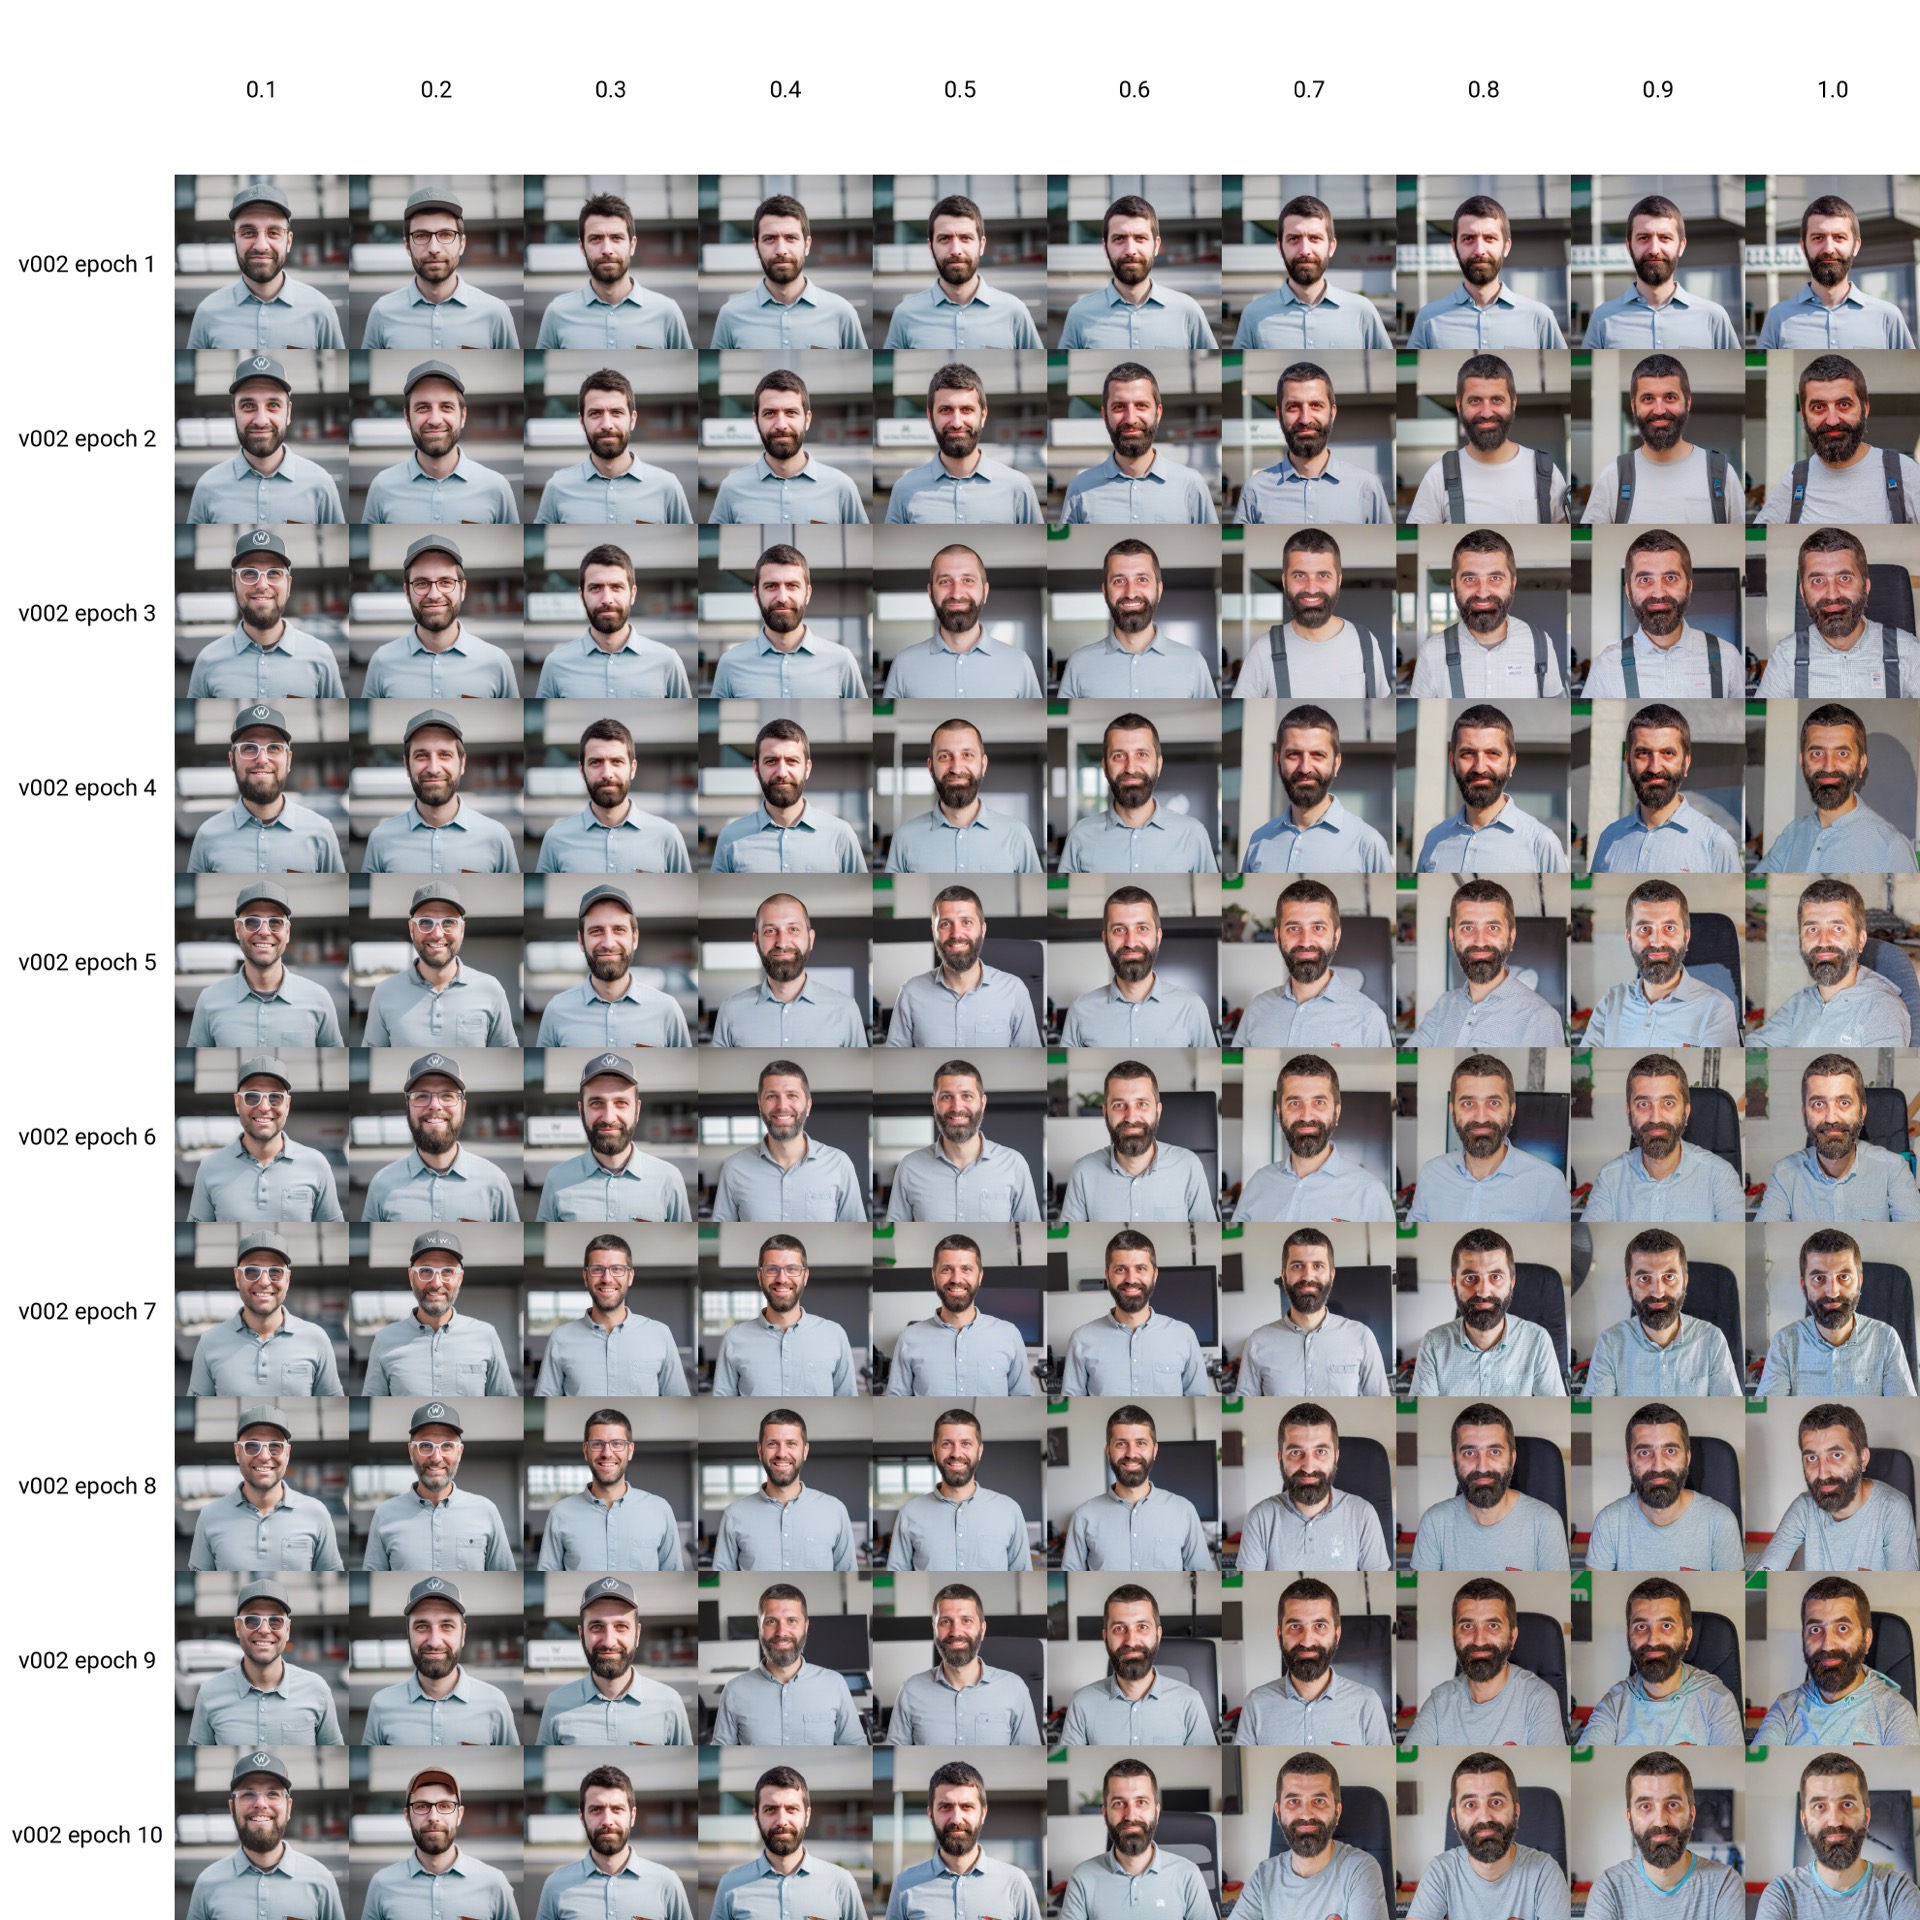
Looking at this plot, I noticed that after about 5 epochs (which was equal to about 1000 steps in my case) the Lora was pretty able to generate a picture of me. However, the pictures at Lora strength one all seemed to have too high contrast and noise.
I tried a few prompts, with the same seed, steps & config scale as the grid above. Ideally, your Lora shouldn’t affect the general class you’re levaraging. In my case, it shouldn’t affect prompts with the just the word man (and not my w0ut3r special keyword).
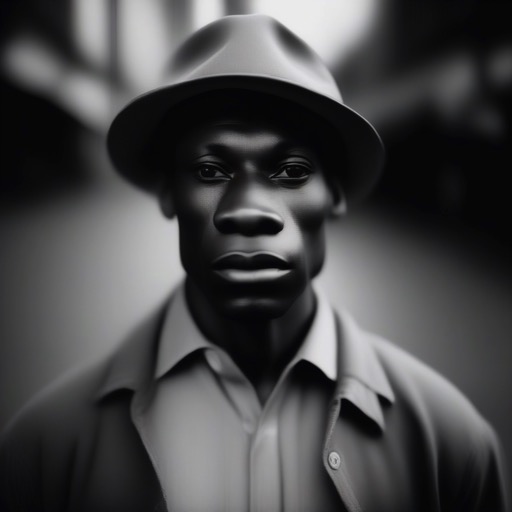
This was an indication to me that my regularisation images were probably not good enough. I wanted to save some time, and generated those images with the Euler ancestral sampler, 20 steps, without the refiner.
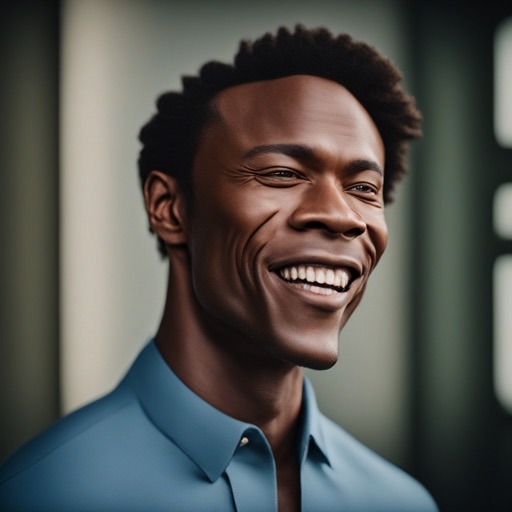
Here’s how one of those regularization images looked like:
I think the smoother look of these regularization images was amplified by my training process, making the w0ut3r images sharper, and the man images smoother than they should have been.
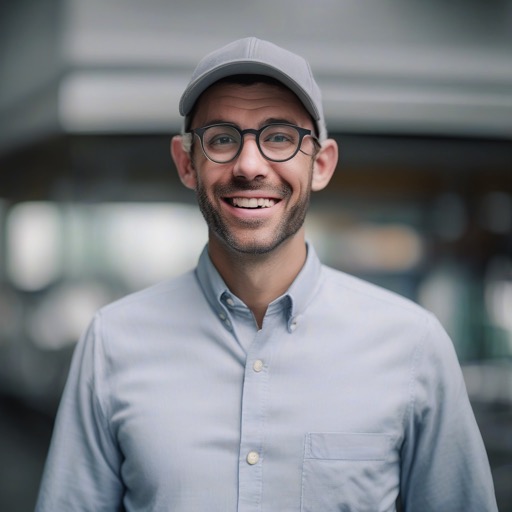
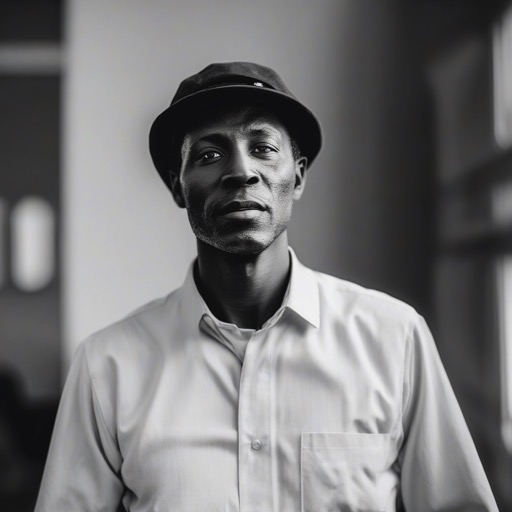
So, I generated another batch of regularization images, using the same, detailed prompts, but this time I took some extra time to use the SDXL refiner on them and switched the sampling method to dpmpp_2s_ancestral.
I trained my Lora again, using the same settings as before, but this time with the new regularization images. I called this version v002d. Letter “d”: yes, I tried fiddling with the learning rates and scheduler in 002b and 002c, but that didn’t make any difference.
The picture quality was a lot better in this case.

Defining some prompts
With a first version being ok, I defined a few prompts I was going to try on the 14 versions of the Lora. Keeping my initial questions (not leaking into main class, versatility and speed) in mind.

- “photo of a man”
- “photo of a w0ut3r man”
- “photo of a man, 1 /4 headshot, from side, looking away, mouth closed, smiling”
- “photo of a w0ut3r man, 1 /4 headshot, from side, looking away, mouth closed, smiling”
- “breathtaking selfie man on a cliff, Fjords in background, award winning, professional”
- “breathtaking selfie w0ut3r man on a cliff, Fjords in background, award winning,professional”
- “photo of a man in Southern France, wearing a plain red t - shirt and darkblue shorts, Provence, lavender fields in background, hdr”
- “photo of a w0ut3r man in Southern France, wearing a plain red t - shirt and darkblue shorts, Provence, lavender fields in background, hdr”
- “line art drawing of a man, headshot, professional, sleek, modern, minimalist, graphic line art, vector graphics”
negative: “anime, photorealistic, realism, realistic” - “line art drawing of a w0ut3r man, headshot, professional, sleek, modern, minimalist graphic, line art, vector graphics”
negative: “anime, photorealistic, realism, realistic” - “man looking into the camera by Pixar and Dreamworks, cinematic, muted colors, faded”
negative: “photo, photographic, photorealistic, realism” - “w0ut3r man looking into the camera by Pixar and Dreamworks, cinematic, muted colors faded”
negative: “photo, photographic, photorealistic, realism”
The beauty of SDXL is you need less “special keywords” or negative prompting to get good results.
The other settings for generating the images were:
- seed: 156680208700286
- steps: 20
- cfg: 7
- sampler_name: “dpmpp_2s_ancestral”
Generating a ton of images
I needed to generate quite a lot of images, which called for some automation. While doing the initial rendering of the images of v002, I had quite a couple of times A1111 Webui crashed on me, running out of memory after a while. ComfyUI was a lot more stable in my experience, but had less built-in options to generate the variations I needed.
Luckely, it does come in with a built-in api which I could leverage.
I set up a very basic ComfyUI workflow with a Lora in between, exported it as an api json, and set up a python script to send api requests to ComfyUI:
import os
import sys
import requests
import json
from PIL import Image

comfyUIUrl = 'http://127.0.0.1:8188/prompt'

def main():
  # load the workflow json
  apiJSON = json.load(open('workflow_api.json'))

  promptTemplate = {
    'filename_prefix': "v014_selfie",
    'positive': "photo of a w0ut3r man",
    'negative': "",
    'seed': 156680208700286,
    'steps': 20,
    'cfg': 7,
    'sampler_name': "dpmpp_2s_ancestral",
    'lora_name': "wouter_xl_1.0_v014.safetensors",
    'lora_strength_model': 1,
    'lora_strength_clip': 1,
  }

  # load the axis
  # xAxis = json.load(open('data/lora_selfie_x.json'))
  # yAxis = json.load(open('data/lora_strength_y.json'))
  xAxis = [
    {
      "positive": "photo of a man",
      "negative": ""
    },
    {
      "positive": "photo of a w0ut3r man",
      "negative": ""
    },
    {
      "positive": "photo of a man, 1 /4 headshot, from side, looking away, mouth closed, smiling",
      "negative": ""
    },
    {
      "positive": "photo of a w0ut3r man, 1 /4 headshot, from side, looking away, mouth closed, smiling",
      "negative": ""
    },
    {
      "positive": "breathtaking selfie man on a cliff, Fjords in background, award winning, professional",
      "negative": ""
    },
    {
      "positive": "breathtaking selfie w0ut3r man on a cliff, Fjords in background, award winning, professional",
      "negative": ""
    },
    {
      "positive": "photo of a man in Southern France, wearing a plain red t - shirt and dark blue shorts, Provence, lavender fields in background, hdr",
      "negative": ""
    },
    {
      "positive": "photo of a w0ut3r man in Southern France, wearing a plain red t - shirt and dark blue shorts, Provence, lavender fields in background, hdr",
      "negative": ""
    },
    {
      "positive": "line art drawing of a man, headshot, professional, sleek, modern, minimalist, graphic, line art, vector graphics",
      "negative": "anime, photorealistic, realism, realistic"
    },
    {
      "positive": "line art drawing of a w0ut3r man, headshot, professional, sleek, modern, minimalist, graphic, line art, vector graphics",
      "negative": "anime, photorealistic, realism, realistic"
    },
    {
      "positive": "man looking into the camera by Pixar and Dreamworks, cinematic, muted colors, faded",
      "negative": "photo, photographic, photorealistic, realism"
    },
    {
      "positive": "w0ut3r man looking into the camera by Pixar and Dreamworks, cinematic, muted colors, faded",
      "negative": "photo, photographic, photorealistic, realism"
    }
  ]
  yAxis = [
    {
      "lora_name": "wouter_xl_1.0_v014-000001.safetensors"
    },
    {
      "lora_name": "wouter_xl_1.0_v014-000002.safetensors"
    },
    {
      "lora_name": "wouter_xl_1.0_v014-000003.safetensors"
    },
    {
      "lora_name": "wouter_xl_1.0_v014-000004.safetensors"
    },
    {
      "lora_name": "wouter_xl_1.0_v014-000005.safetensors"
    },
    {
      "lora_name": "wouter_xl_1.0_v014-000006.safetensors"
    },
    {
      "lora_name": "wouter_xl_1.0_v014-000007.safetensors"
    },
    {
      "lora_name": "wouter_xl_1.0_v014-000008.safetensors"
    },
    {
      "lora_name": "wouter_xl_1.0_v014-000009.safetensors"
    },
    {
      "lora_name": "wouter_xl_1.0_v014.safetensors"
    }
  ]

  # generate prompts for these two axis
  prompts = []
  for y in yAxis:
    for x in xAxis:
      prompt = promptTemplate.copy()
      prompt.update(x)
      prompt.update(y)
      prompts.append(prompt)

  # send the prompts
  for prompt in prompts:
    send_prompt(apiJSON, prompt)

def send_prompt(apiJSON, prompt):
  samplers = get_nodes_by_class_type(apiJSON, 'KSampler')
  for sampler in samplers:
    sampler['inputs']['seed'] = prompt['seed']
    sampler['inputs']['steps'] = prompt['steps']
    sampler['inputs']['cfg'] = prompt['cfg']
    sampler['inputs']['sampler_name'] = prompt['sampler_name']
    positive_prompt_input = apiJSON[sampler['inputs']['positive'][0]]
    negative_prompt_input = apiJSON[sampler['inputs']['negative'][0]]
    if positive_prompt_input:
      positive_prompt_input['inputs']['text'] = prompt['positive']
    if negative_prompt_input:
      negative_prompt_input['inputs']['text'] = prompt['negative']
  lora_nodes = get_nodes_by_class_type(apiJSON, 'LoraLoader')
  for lora_node in lora_nodes:
    lora_node['inputs']['lora_name'] = prompt['lora_name']
    lora_node['inputs']['strength_model'] = prompt['lora_strength_model']
    lora_node['inputs']['strength_clip'] = prompt['lora_strength_clip']

  save_nodes = get_nodes_by_class_type(apiJSON, 'SaveImage')
  for save_node in save_nodes:
    save_node['inputs']['filename_prefix'] = prompt['filename_prefix']
  response = requests.post(comfyUIUrl, data=json.dumps({'prompt': apiJSON}), headers={'Content-Type': 'application/json'})

def get_nodes_by_class_type(apiJSON, classType):
  nodes = []
  for key in apiJSON:
    node = apiJSON[key]
    hasClassTypeProperty = 'class_type' in node
    isClassType = hasClassTypeProperty and node['class_type'] == classType
    if isClassType:
      nodes.append(node)
  return nodes

if __name__ == "__main__":
  main()
By executing python run_batch.py it then executed the api calls to ComfyUI.
I scheduled image generations for:
- Lora strength tables: 14 tables where I wanted to plot each of the 10 epochs and the Lora impact from 0.1 to 1.0. Each one of these tables contains 100 images, resulting in 1400 images.
- Prompt tables: for each of the 14 Lora’s, at each epoch, plot the 12 prompts at Lora strength 1. Each one of these tables contains 120 images, resulting in 1680 images.
So in total, I needed to generate 3080 images. I didn’t want to spend cloud credits on work I could do offline: I had access to 2 RTX 2060 laptops. It took on average about 70 seconds per image (these laptops weren’t the fastest). In total I had to wait for about 30 hours before all rendering was done. ComfyUI didn’t crash once.
Generating the plots
I wasn’t using webui (with it’s built-in xyz plot script), and I wanted some of the resulting images to end up in different tables. So I wrote a python script to generate plots for me, where I can specify an input folder, column count and labels:
import os
import sys
import math
import argparse
from PIL import Image, ImageFont, ImageDraw, ImageColor, PngImagePlugin

roboto_ttf_file = os.path.join("./", 'Roboto-Regular.ttf')

def main(args):

  image_path = args.image_path
  num_cols = args.num_cols
  column_labels = None
  row_labels = None

  target_column_width = 360

  grid_width = (num_cols + 1) * target_column_width
  font_size = 48

  if (args.column_labels is not None):
    column_width = math.ceil(grid_width / (num_cols + 1))
    column_labels = args.column_labels
  else:
    column_width = math.ceil(grid_width / num_cols)

  # get the jpg or png files in the folder, ignore files starting with a dot
  files = [f for f in os.listdir(image_path) if (f.endswith('.png') or f.endswith('.jpg')) and not f.startswith('.')]

  # sort the files by name, ascending
  files.sort()

  print('found ' + str(len(files)) + ' files')

  # max images, if specified
  if args.max_images is not None:
    max_images = args.max_images
    files = files[:max_images]

  num_rows = math.ceil(len(files) / num_cols)

  if (args.row_labels is not None):
    grid_height = (num_rows + 1) * column_width
    row_labels = args.row_labels
  else:
    grid_height = num_rows * column_width

  # create a grid with those images
  grid = Image.new('RGB', (grid_width, grid_height), (255, 255, 255))

  # loop through the files
  for i in range(len(files)):
    # open the image
    image = Image.open(os.path.join(image_path, files[i]))
    # resize the image to the column width
    image = image.resize((column_width, column_width))
    x = (i % num_cols) * column_width
    y = math.floor(i / num_cols) * column_width
    if args.column_labels is not None:
      x += column_width
    if args.row_labels is not None:
      y += column_width
    # paste the image into the grid
    grid.paste(image, (x, y))

  # draw the column labels
  if args.column_labels is not None:
    font = ImageFont.truetype(roboto_ttf_file, font_size)
    draw = ImageDraw.Draw(grid)
    for i in range(len(column_labels)):
      col_x = (i + 1) * column_width
      col_y = 0
      # measure the text size
      text_width = font.getlength(column_labels[i])
      # split the text into words
      words = column_labels[i].split(' ')
      # start with the first word
      text = words[0]
      # loop through the rest of the words
      for j in range(1, len(words)):
        # measure the text size
        text_width = font.getlength(text + ' ' + words[j])
        # if the text is too wide for the column, add a new line
        if text_width > column_width:
          text += '\n' + words[j]
        else:
          text += ' ' + words[j]
      # split the text into lines
      lines = text.split('\n')
      text_height = len(lines) * font_size
      # loop through the lines
      for j in range(len(lines)):
        # measure the text size
        text_width = font.getlength(lines[j])
        # draw the text
        x = col_x + (column_width - text_width) / 2
        y = col_y + (j * font_size) + (column_width - text_height) / 2
        draw.text((x, y), lines[j], font=font, fill=(0, 0, 0))

  # draw the row labels
  if args.row_labels is not None:
    font = ImageFont.truetype(roboto_ttf_file, font_size)
    draw = ImageDraw.Draw(grid)
    for i in range(len(row_labels)):
      # measure the text size
      text_size = font.getlength(row_labels[i])
      # draw the text
      x = (column_width - text_size) / 2
      y = (i + 1) * column_width + (column_width - font_size) / 2
      draw.text((x, y), row_labels[i], font=font, fill=(0, 0, 0))

  # save the grid, filename is the same as the folder name, store it one directory above the input image path
  output_filename = os.path.basename(os.path.normpath(image_path)) + '.png'
  output_path = os.path.join(os.path.dirname(image_path), output_filename)
  grid.save(output_path)

def setup_parser() -> argparse.ArgumentParser:
  parser = argparse.ArgumentParser(description='Create a grid of images from a folder of images')
  parser.add_argument('--image_path', type=str, default=None, help='The path to the folder of images')
  parser.add_argument('--num_cols', type=int, default=None, help='The number of image columns in the grid')
  parser.add_argument('--max_images', type=int, default=None, help='The maximum number of images to include in the grid')
  # list of strings for column labels
  parser.add_argument('--column_labels', action='append', type=str, default=None, help='The labels for each column')
  parser.add_argument('--row_labels', action='append', type=str, default=None, help='The labels for each row')
  return parser

if __name__ == "__main__":
  parser = setup_parser()
  args = parser.parse_args()
  main(args)
I could call this script like so:
python create_grid_of_images.py --num_cols=12 --column_labels="photo man" --column_labels="photo w0ut3r man" --column_labels="photo man side" --column_labels="photo w0ut3r man side" --column_labels="selfie man fjord" --column_labels="selfie w0ut3r man fjord" --column_labels="photo man provence" --column_labels="photo w0ut3r man provence" --column_labels="line art drawing man" --column_labels="line art drawing w0ut3r man" --column_labels="man Pixar & Dreamworks" --column_labels="w0ut3r man Pixar & Dreamworks" --row_labels="v001 epoch 5" --row_labels="v002 epoch 7" --row_labels="v003 epoch 7" --row_labels="v004 epoch 4" --row_labels="v005 epoch 4" --row_labels="v006 epoch 10" --row_labels="v007 epoch 6" --row_labels="v008 epoch 6" --row_labels="v009 epoch 6" --row_labels="v010 epoch 9" --row_labels="v011 epoch 5" --row_labels="v012 epoch 6" --row_labels="v013 epoch 6" --row_labels="v014 epoch 9" --image_path='/Volumes/Extreme SSD/sd/blog/grid-good-simple-photo'Ok, it’s a long command, but with some smart find and replace it didn’t take too much work. It was also a flexible solution for me to generate different grids, with different labels, and reuse some of the images where applicable.
The results
Training leaks into the main class
When generating images without my w0ut3r keyword, do the other people look like me (which they shouldn’t)?
This is the baseline, where no Lora is applied:

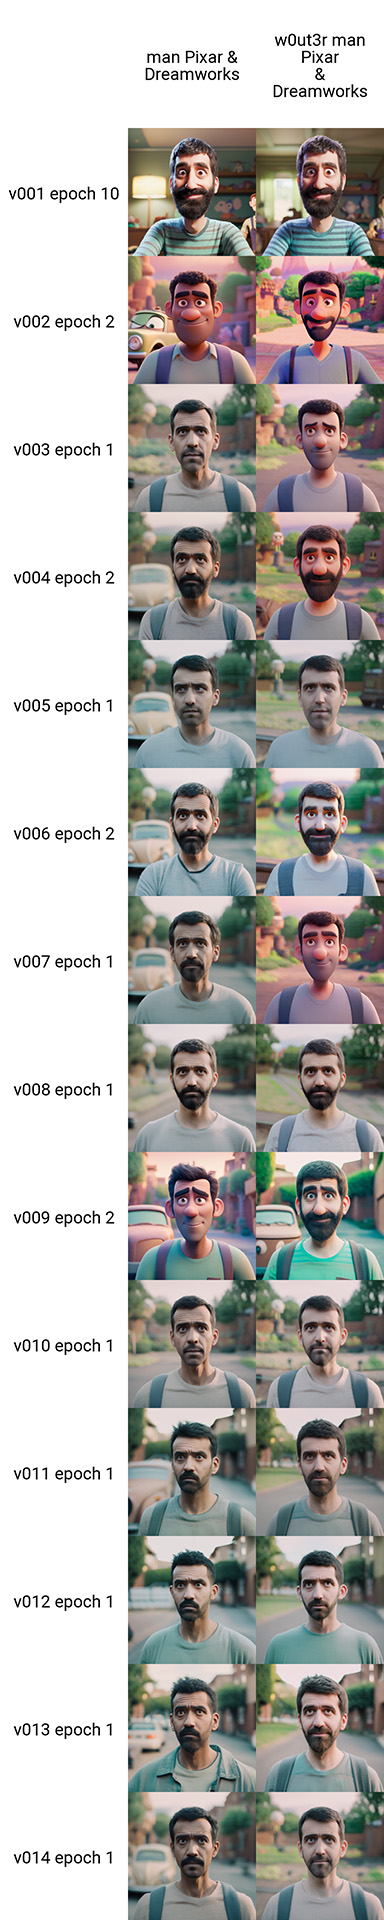
Here’s a table plotting epoch 10 of each of the Loras, these prompts do not contain my keyword:
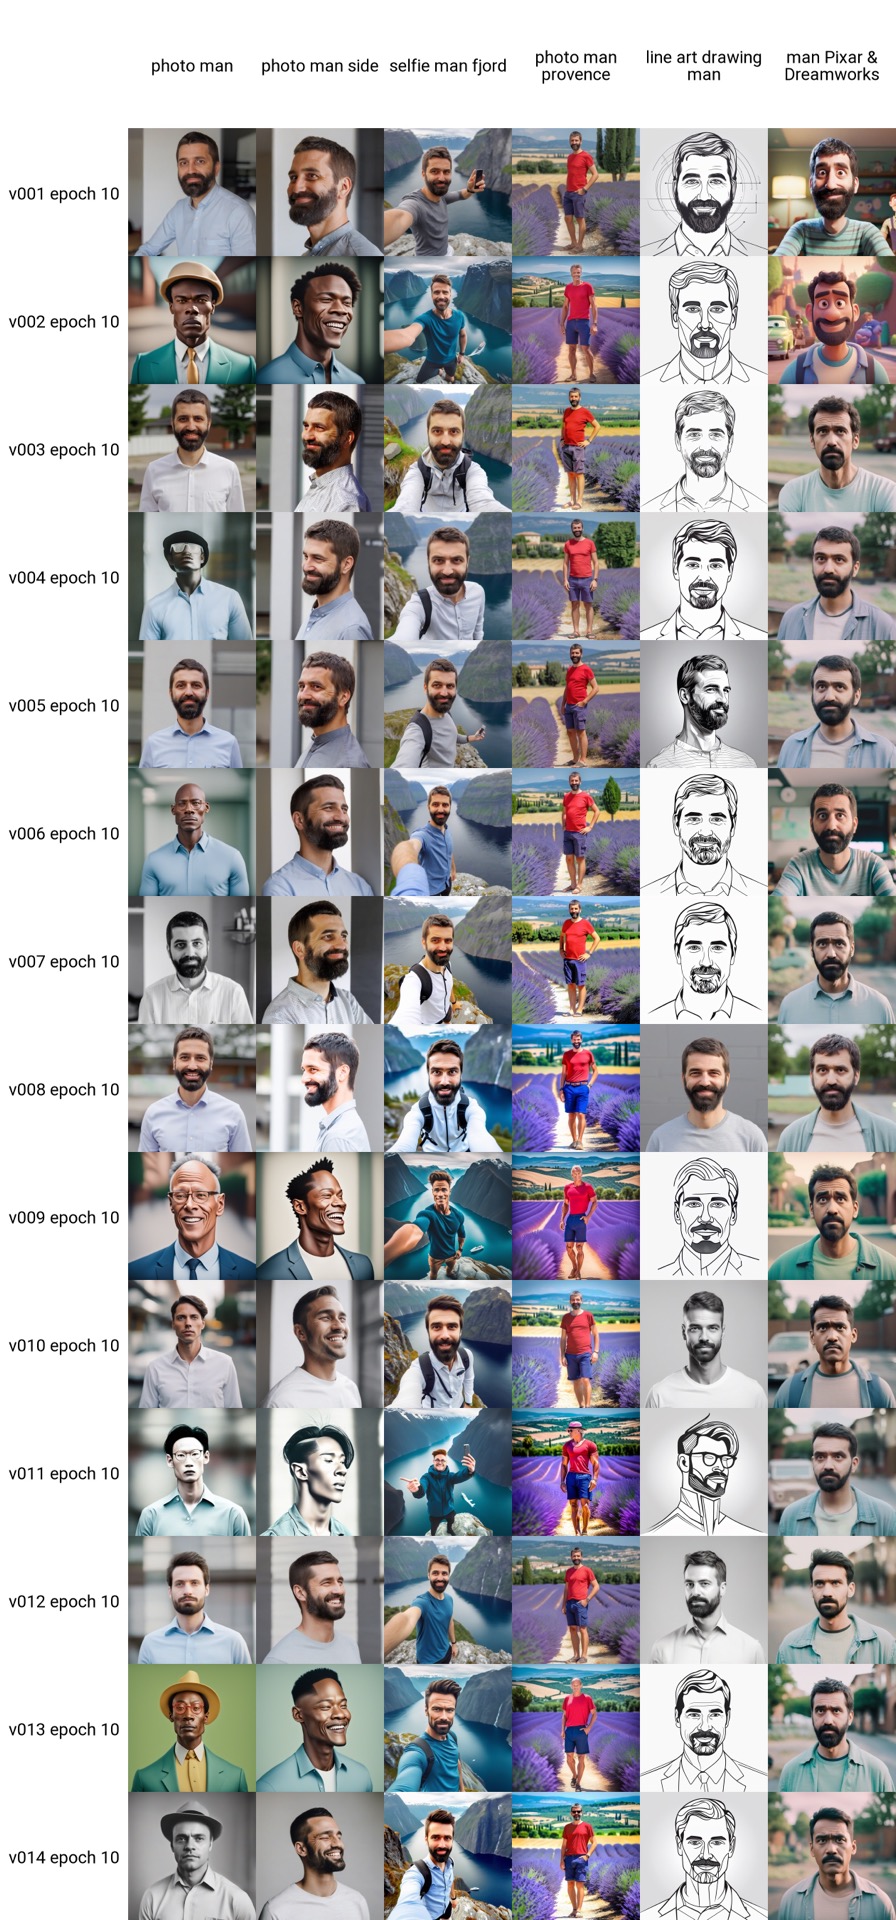
I put the evaluation of the 14 versions in a table, where I could also see the original configuration (reg images, captions, etc…):
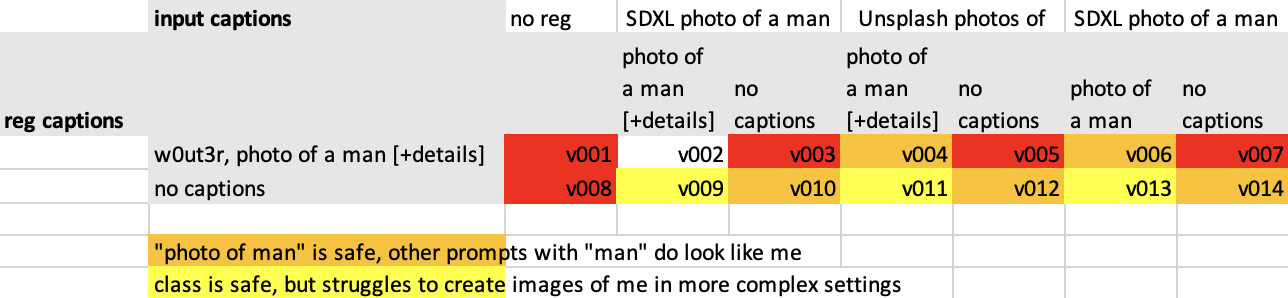
Conclusion on leaking
- The only good version is v002: detailed captions on both the input and regularization images, the regularization images are generated with the captions from the input image.
- I need captioned regularization images for my class not to leak
- Captioning my input images has less effect on leaking, but makes my model less reliable to control: while it doesn’t leak, I wasn’t able to create photos of me in different settings.
For the next tests, I’ll ignore the leaking into the main class. I’m going to focus on the quality of the images of the subject.
First epoch with a good, simple photo of the subject
For this benchmark, I wanted to see how fast the Lora learns to generate a simple photo of me. It’s more important that I’m recognizable, than to have a good picture quality. I defined a simple photo as a short prompt, with words that are present in the captions.
- “photo of a man”
- “photo of a w0ut3r man”
- “photo of a man, 1 /4 headshot, from side, looking away, mouth closed, smiling”
- “photo of a w0ut3r man, 1 /4 headshot, from side, looking away, mouth closed, smiling”
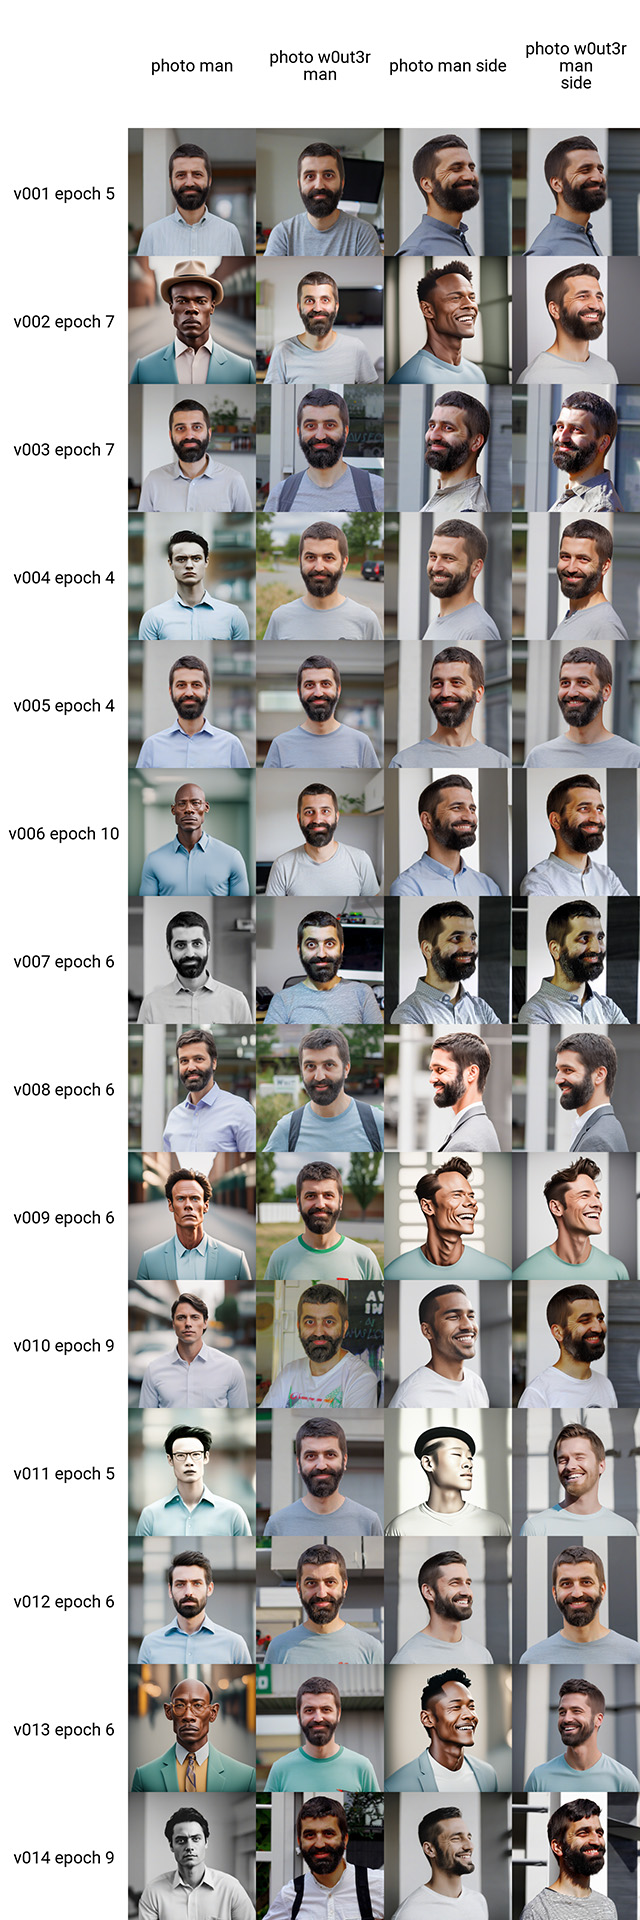
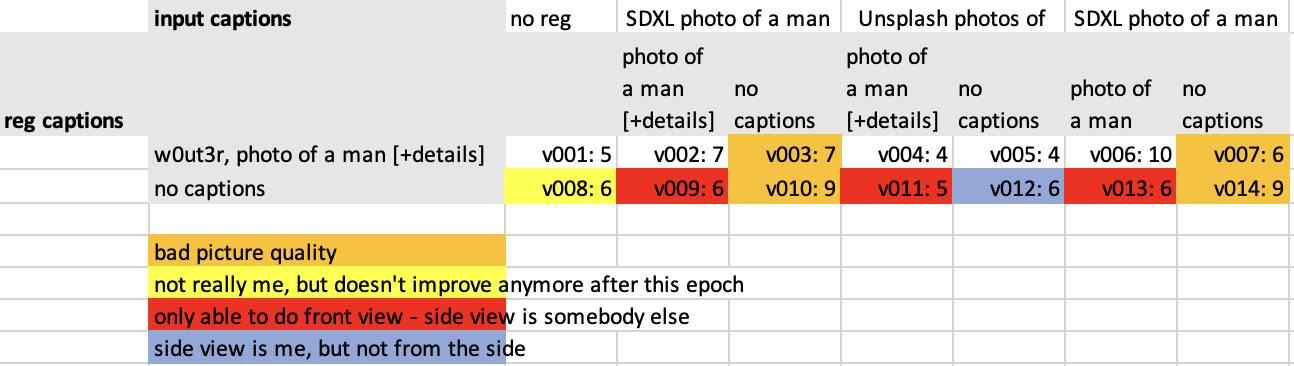
Conclusion for simple photos
- The fasted trained model with good results is where the input is captioned and the regularization images are real photos. (v004 and v005).
- Captioning my input images is the best chance of good quality and faster learning than no input captions.
- I can get away without regularization images, as long as I caption my input images (v001).
- Without input captions, don’t bother with regularization captions.
- Only acceptable result without input captions is with real photo regularization images (v012), not with generated images.
First epoch with a good, “complex” photo of the subject
For this benchmark, I wanted to see how fast the Lora learns to generate a complex photo of me. I define a “complex photo” as a prompt, with words that are not present in the captions. It’s more important that I’m recognizable, than to have a good picture quality
- “breathtaking selfie man on a cliff, Fjords in background, award winning, professional”
- “breathtaking selfie w0ut3r man on a cliff, Fjords in background, award winning, professional”
- “photo of a man in Southern France, wearing a plain red t - shirt and darkblue shorts, Provence, lavender fields in background, hdr”
- “photo of a w0ut3r man in Southern France, wearing a plain red t - shirt and darkblue shorts, Provence, lavender fields in background, hdr”
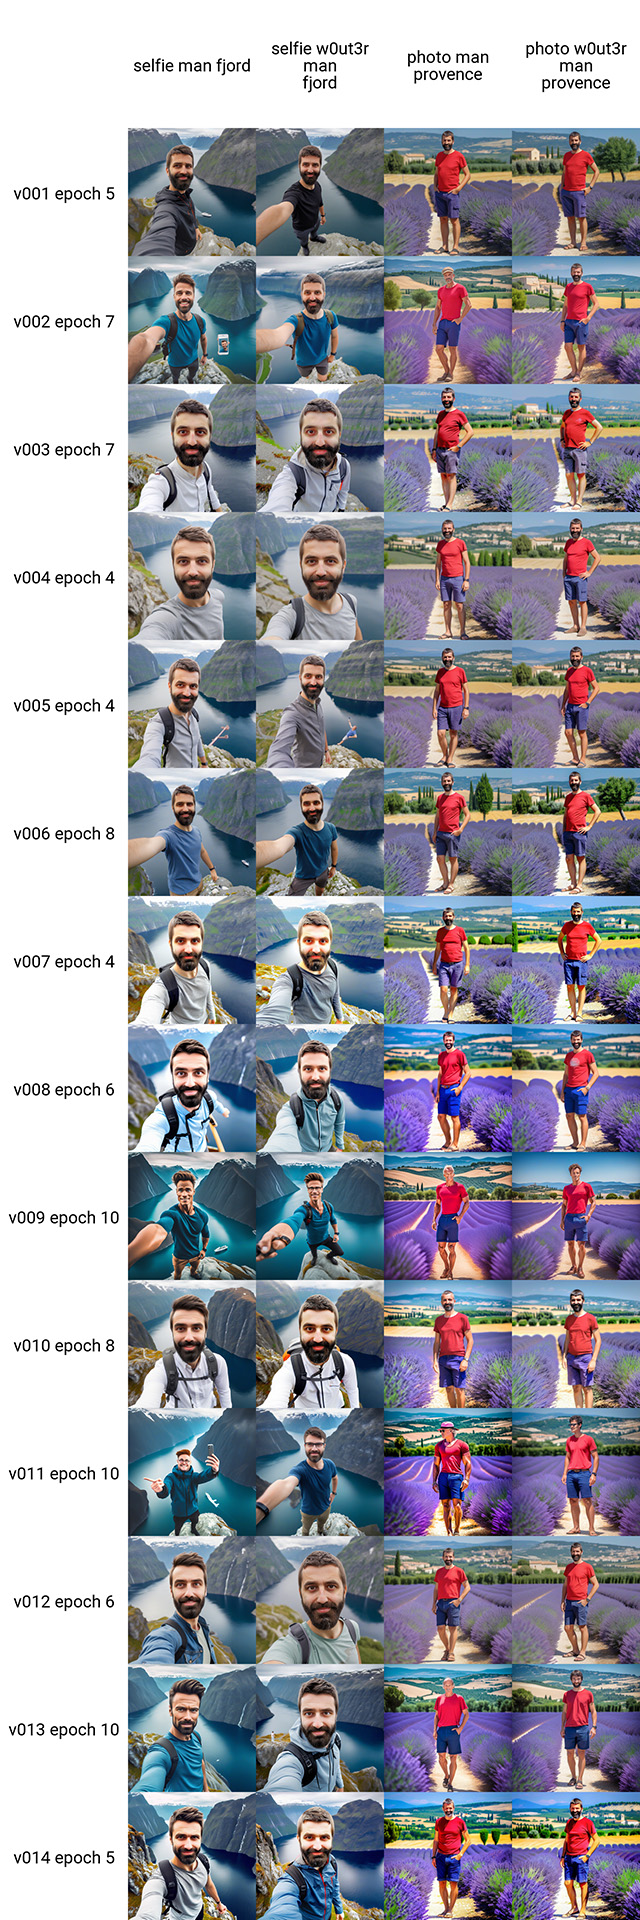
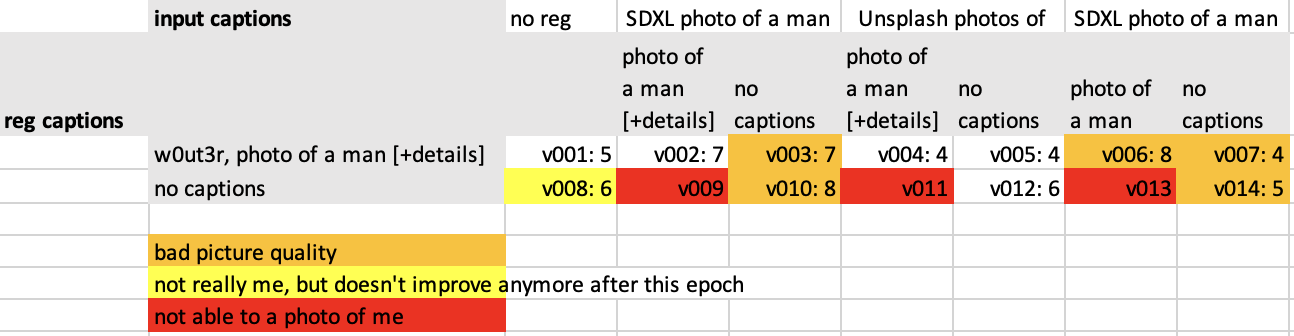
Conclusion for complex photos
The findings here, are exactly the same as with the simple photos. Some of the “bad” Lora’s of the simple photos are performing worse here, but the good ones are still good. They’re not slower to train than the simple photos, which surprised me.
- The fasted trained model with good results is where the input is captioned and the regularization images are real photos. (v004 and v005).
- Captioning my input images is the best chance of good quality and faster learning than no input captions.
- I can get away without regularization images, as long as I caption my input images (v001).
- Without input captions, don’t bother with regularization captions.
- Only acceptable result without input captions is with real photo regularization images (v012), not with generated images.
First epoch with a good line drawing of the subject
The next test is generating something else than a photo. I chose to do a line drawing. For this one, I added a negative prompt as well, to exclude photos in the result.
- “line art drawing of a man, headshot, professional, sleek, modern, minimalist, graphic line art, vector graphics”
negative: “anime, photorealistic, realism, realistic” - “line art drawing of a w0ut3r man, headshot, professional, sleek, modern, minimalist graphic, line art, vector graphics”
negative: “anime, photorealistic, realism, realistic”
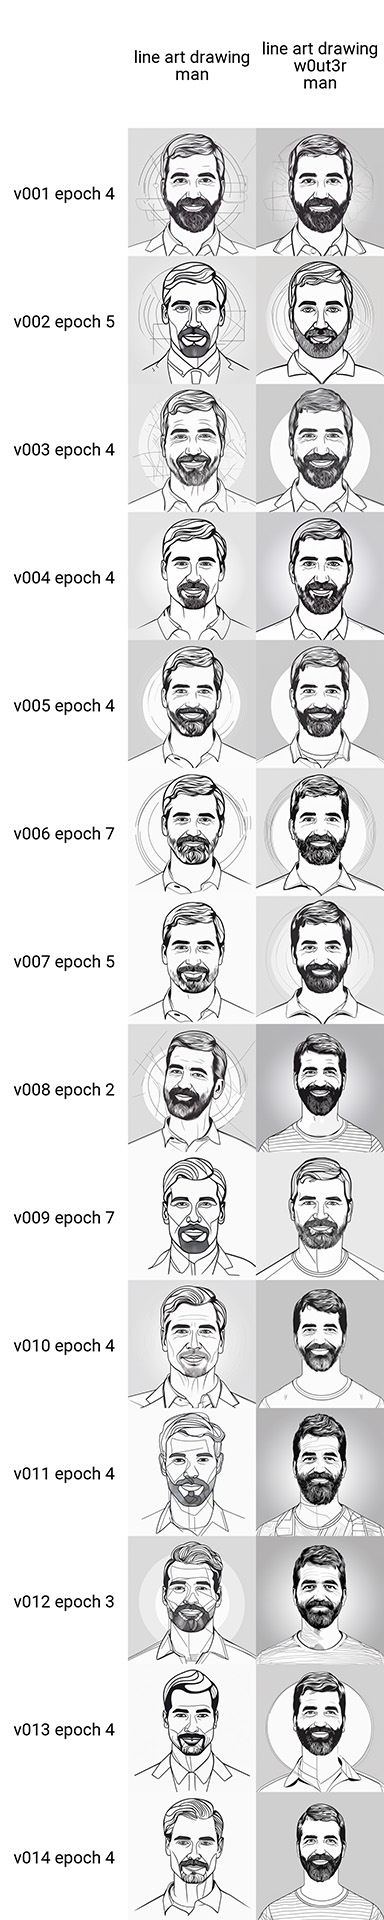
All of the models were able to generate a line drawing that looks like me. However, some of the models started failing this task in a later epoch.
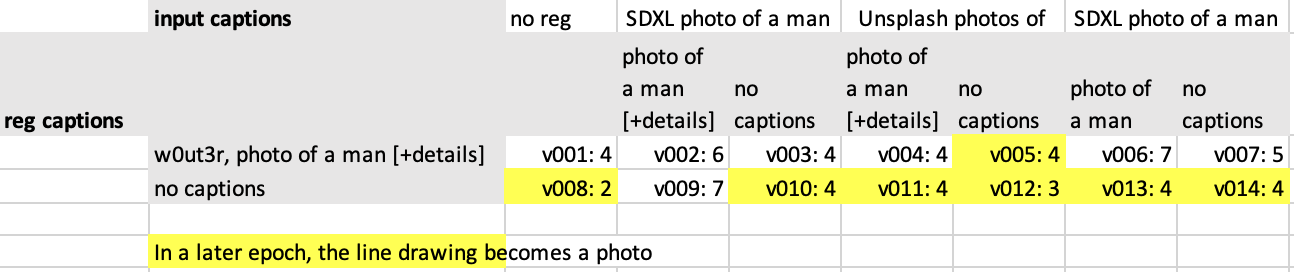
Conclusion for line drawings
- All versions were able to generate a line drawing of me, most of them after 4 epochs.
- Without input captions, the line drawing almost always becomes a photo after longer training. The only exception here is v009, where the regularization images were generated with the captions of the input images AND the captions are present.
3D Cartoon of the subject
My final prompt is generating a 3D cartoon version, which roughly tests the same as the line drawing.
- “man looking into the camera by Pixar and Dreamworks, cinematic, muted colors, faded”
negative: “photo, photographic, photorealistic, realism” - “w0ut3r man looking into the camera by Pixar and Dreamworks, cinematic, muted colors faded”
negative: “photo, photographic, photorealistic, realism”
This was the hardest one for the models: most of them didn’t look like me at full Lora strength, and some of the models generated photos, even with the negative prompts.
Conclusion for 3D characters
- Only the version with input captions, and no regularization images (v001) stays a 3D cartoon in every epoch at full Lora strength.
- With input captions, all versions are able to do 3D characters, with the exception of real-photo regularization images without captions.
- Without input captions, I need high-quality generated regularization images with captions.
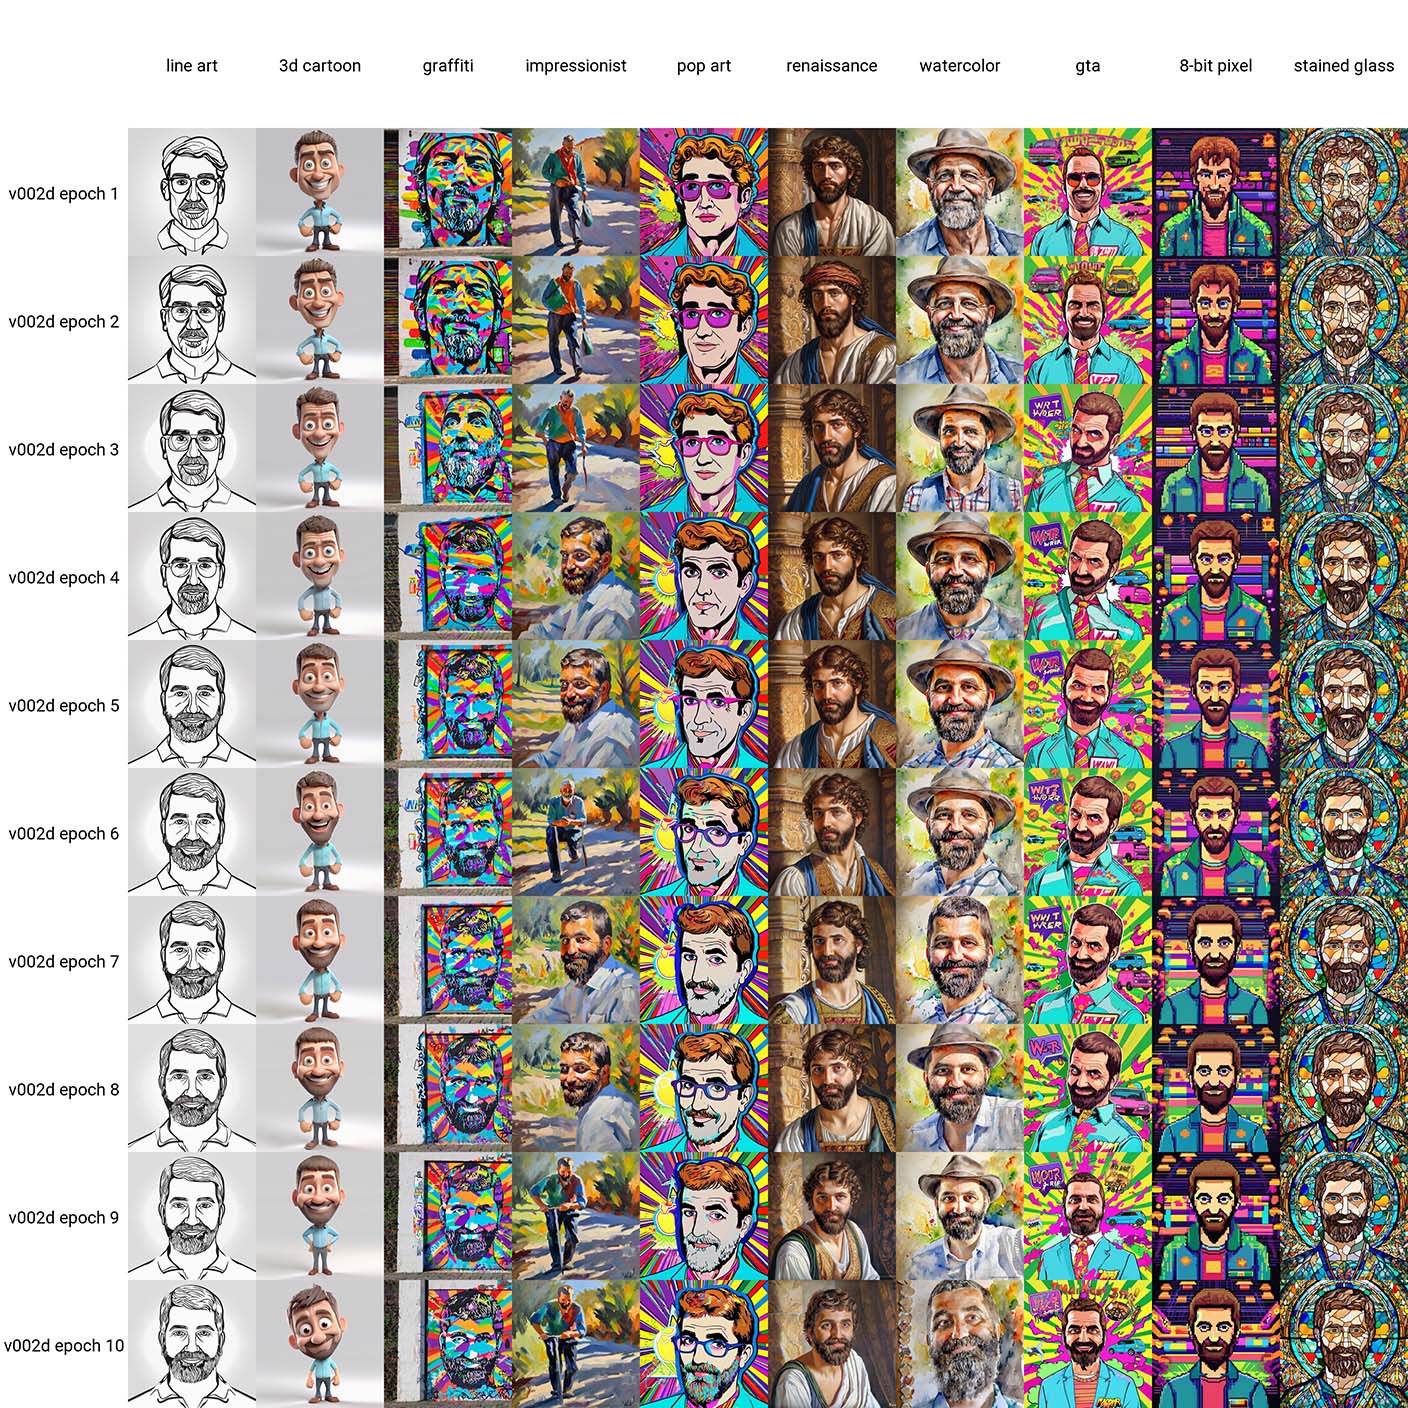
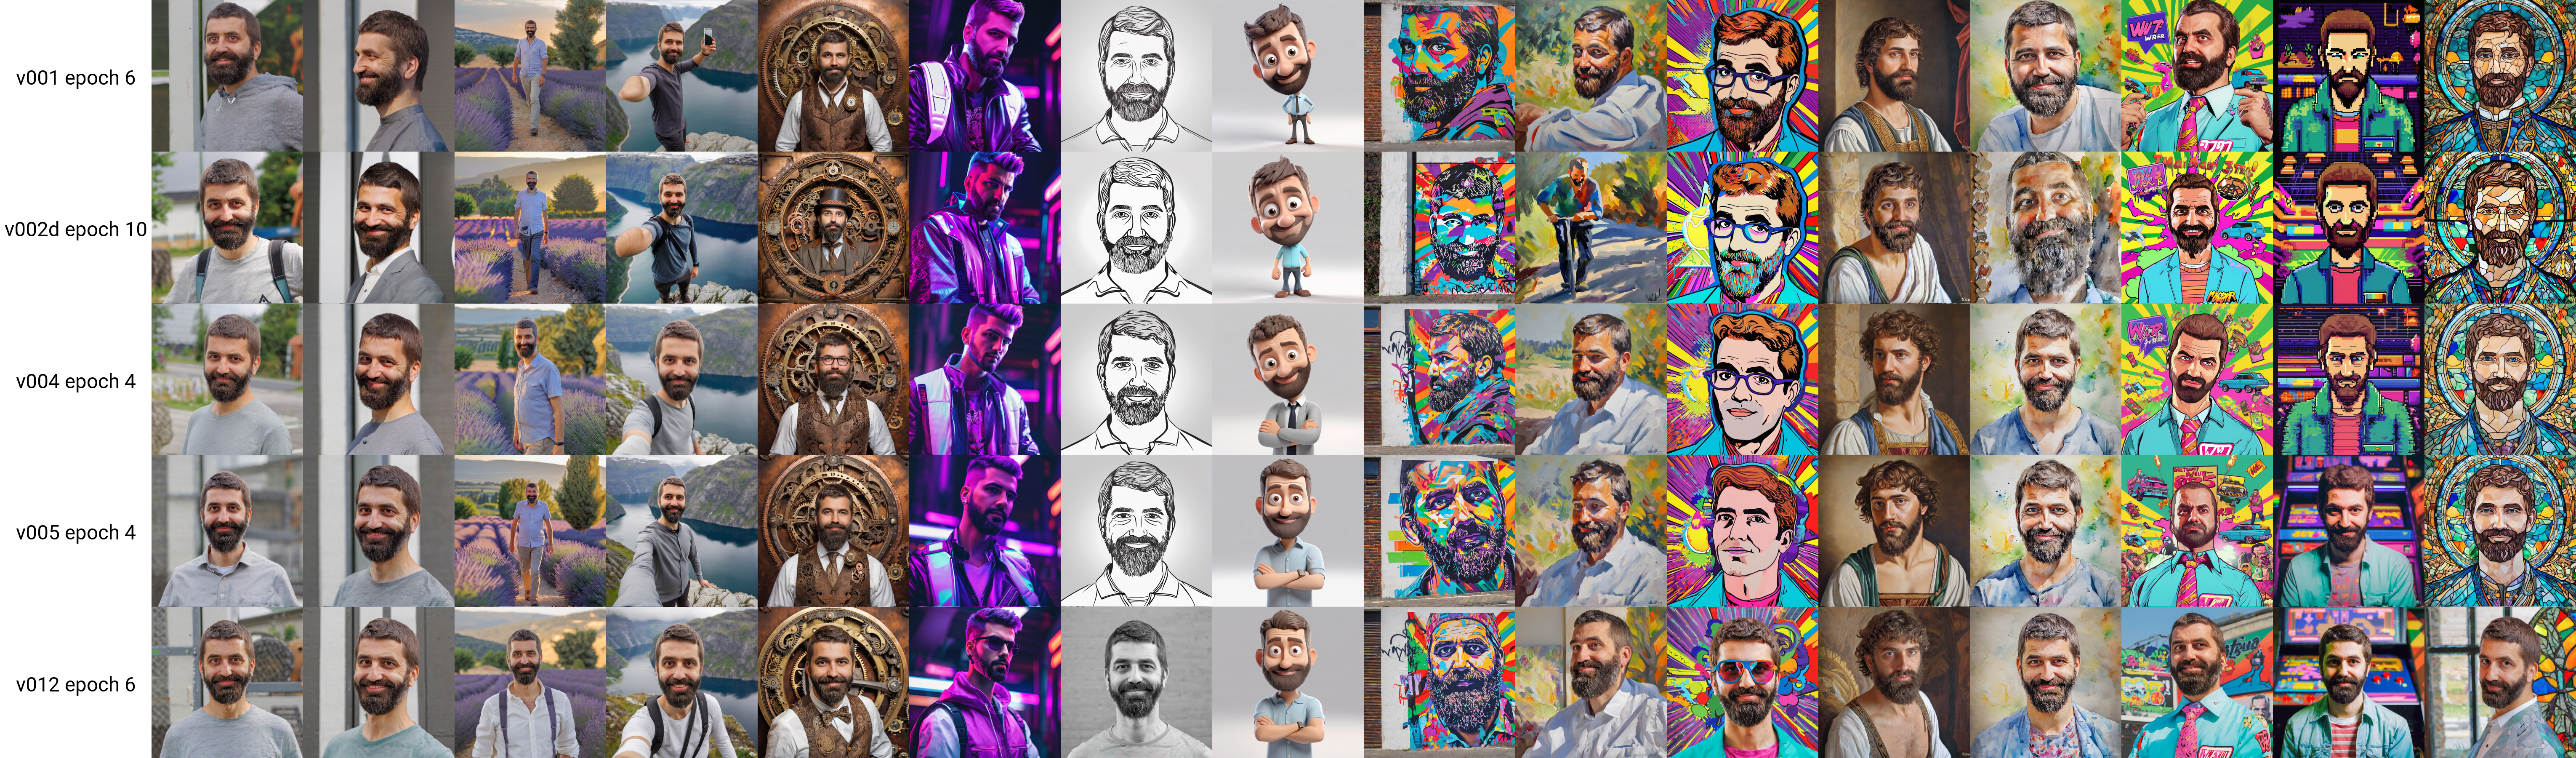
Update: Styling test (August 15, 2023)
I wasn’t entirely satisfied with the styling test (line drawing and 3D render). Especially the 3D render was botched by the fact that I used keywords from my captions (“looking into the camera”) in the beginning of my prompt, which caused the Lora to overdose on the photo style.
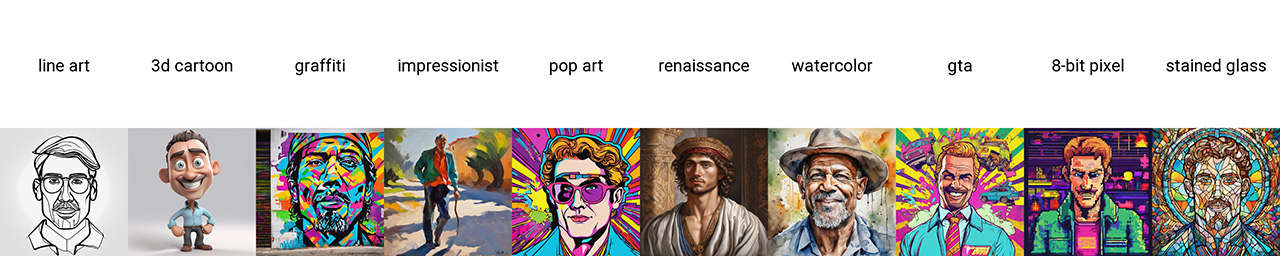
I took a look at the Fooocus project and defined a couple of prompts based upon their style prompts:
- “line art drawing of a w0ut3r man, headshot, professional, sleek, modern, minimalist, graphic, line art, vector graphics”, negative: “anime, photorealistic, realism, realistic”
- “hyper-detailed 3D render of cartoon w0ut3r man in a confident expressive pose, cartoon eyes, caricature, exaggerated facial features, cute cartoon style, white background”, negative: ""
- “graffiti style portrait of a w0ut3r man . street art, vibrant, urban, detailed, tag, mural”, negative: “ugly, deformed, noisy, blurry, low contrast, realism, photorealistic”
- “impressionist painting of a w0ut3r man . loose brushwork, vibrant color, light and shadow play, captures feeling over form”, negative: “anime, photorealistic, 35mm film, deformed, glitch, low contrast, noisy”
- “Pop Art style portrait of a w0ut3r man . bright colors, bold outlines, popular culture themes, ironic or kitsch”, negative: “ugly, deformed, noisy, blurry, low contrast, realism, photorealistic, minimalist”
- “Renaissance style portrait painting of a w0ut3r man . realistic, perspective, light and shadow, religious or mythological themes, highly detailed”, negative: “ugly, deformed, noisy, blurry, low contrast, modernist, minimalist, abstract”
- “watercolor painting portrait of w0ut3r man . vibrant, beautiful, painterly, detailed, textural, artistic”, negative: “anime, photorealistic, 35mm film, deformed, glitch, low contrast, noisy”
- “GTA-style artwork portrait of a w0ut3r man . satirical, exaggerated, pop art style, vibrant colors, iconic characters, action-packed”, negative: “realistic, black and white, low contrast, impressionist, cubist, noisy, blurry, deformed”
- “retro arcade style portrait of a w0ut3r man . 8-bit, pixelated, vibrant, classic video game, old school gaming, reminiscent of 80s and 90s arcade games”, negative: “modern, ultra-high resolution, photorealistic, 3D”
- “stained glass style portrait of a w0ut3r man . vibrant, beautiful, translucent, intricate, detailed”, negative: “ugly, deformed, noisy, blurry, low contrast, realism, photorealistic”
The results of these prompts without any Lora applied look like this:
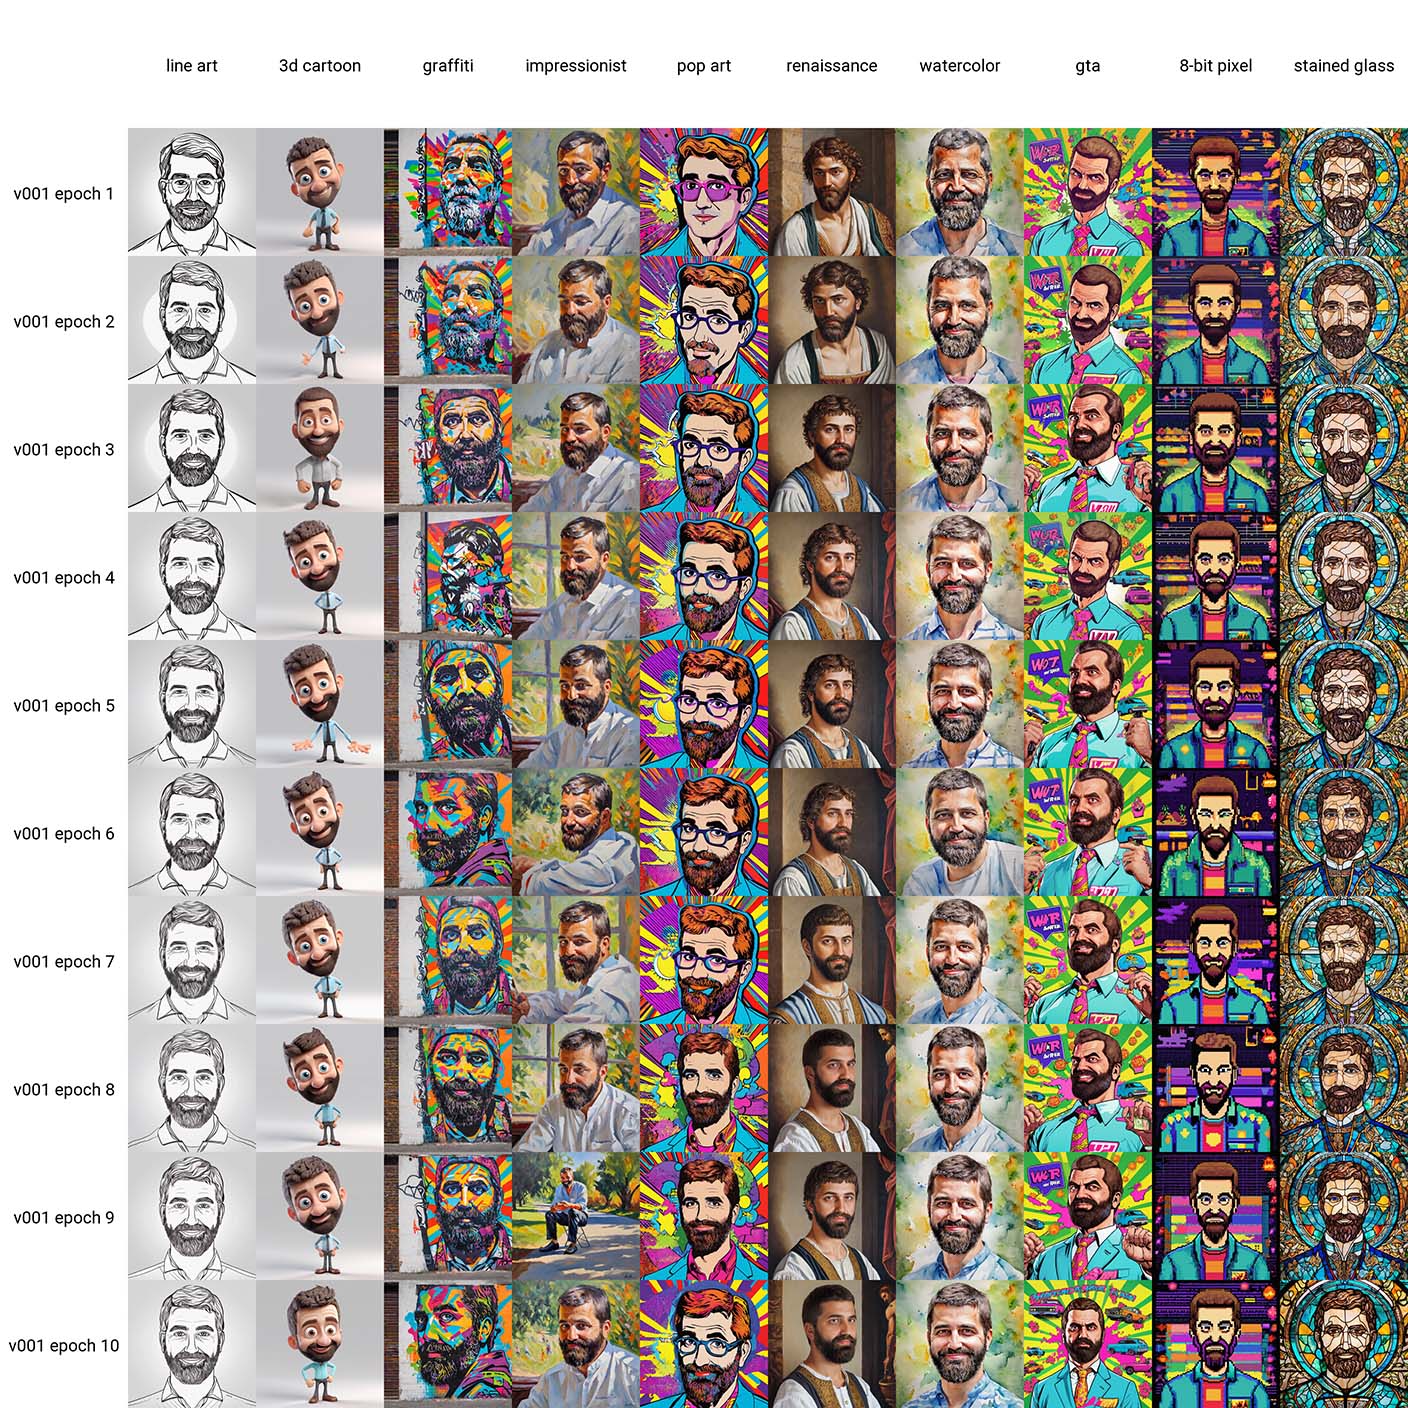
I did extra renders of Lora versions v001, v002d, v004, v005 and v012. These were the Lora’s that were able to generate high quality photos.
It made no sense to spend extra time on the other Lora’s, as they were not able to generate good photos based upon photo input.
Styles v001
Styles v002d
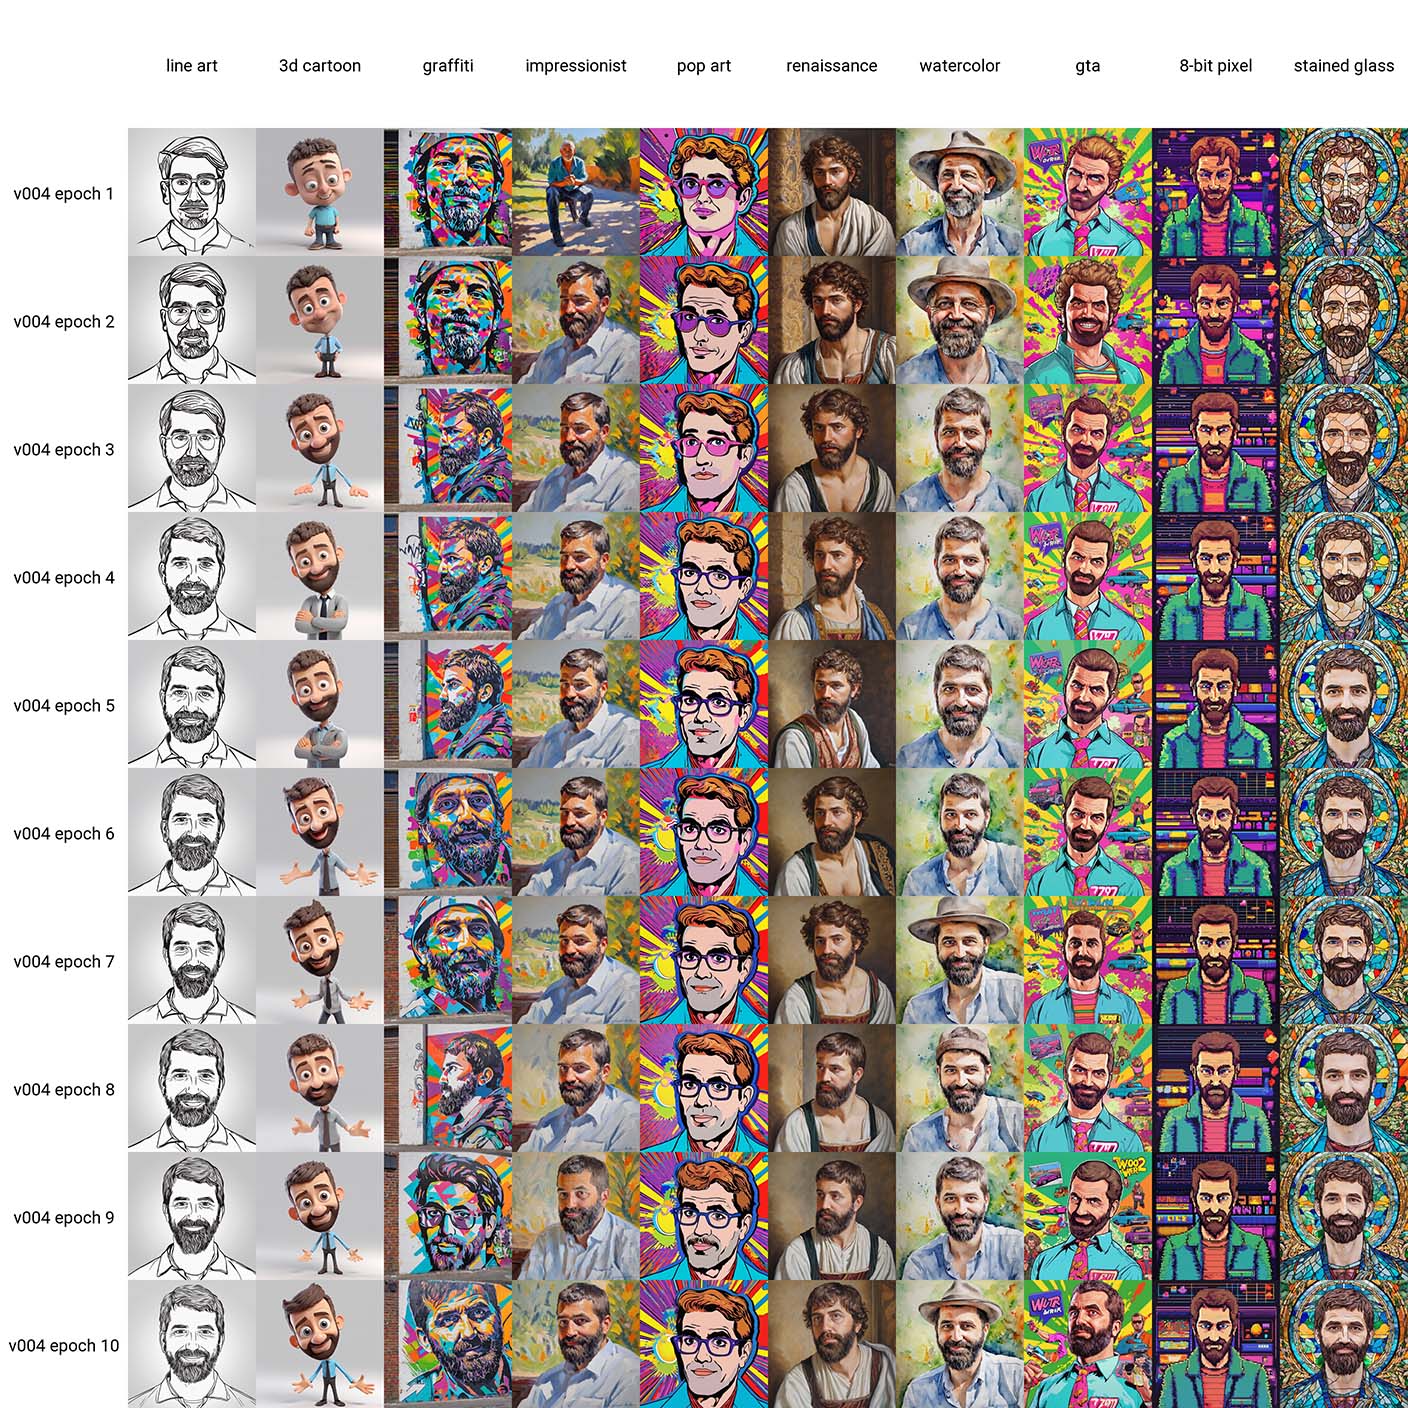
Styles v004
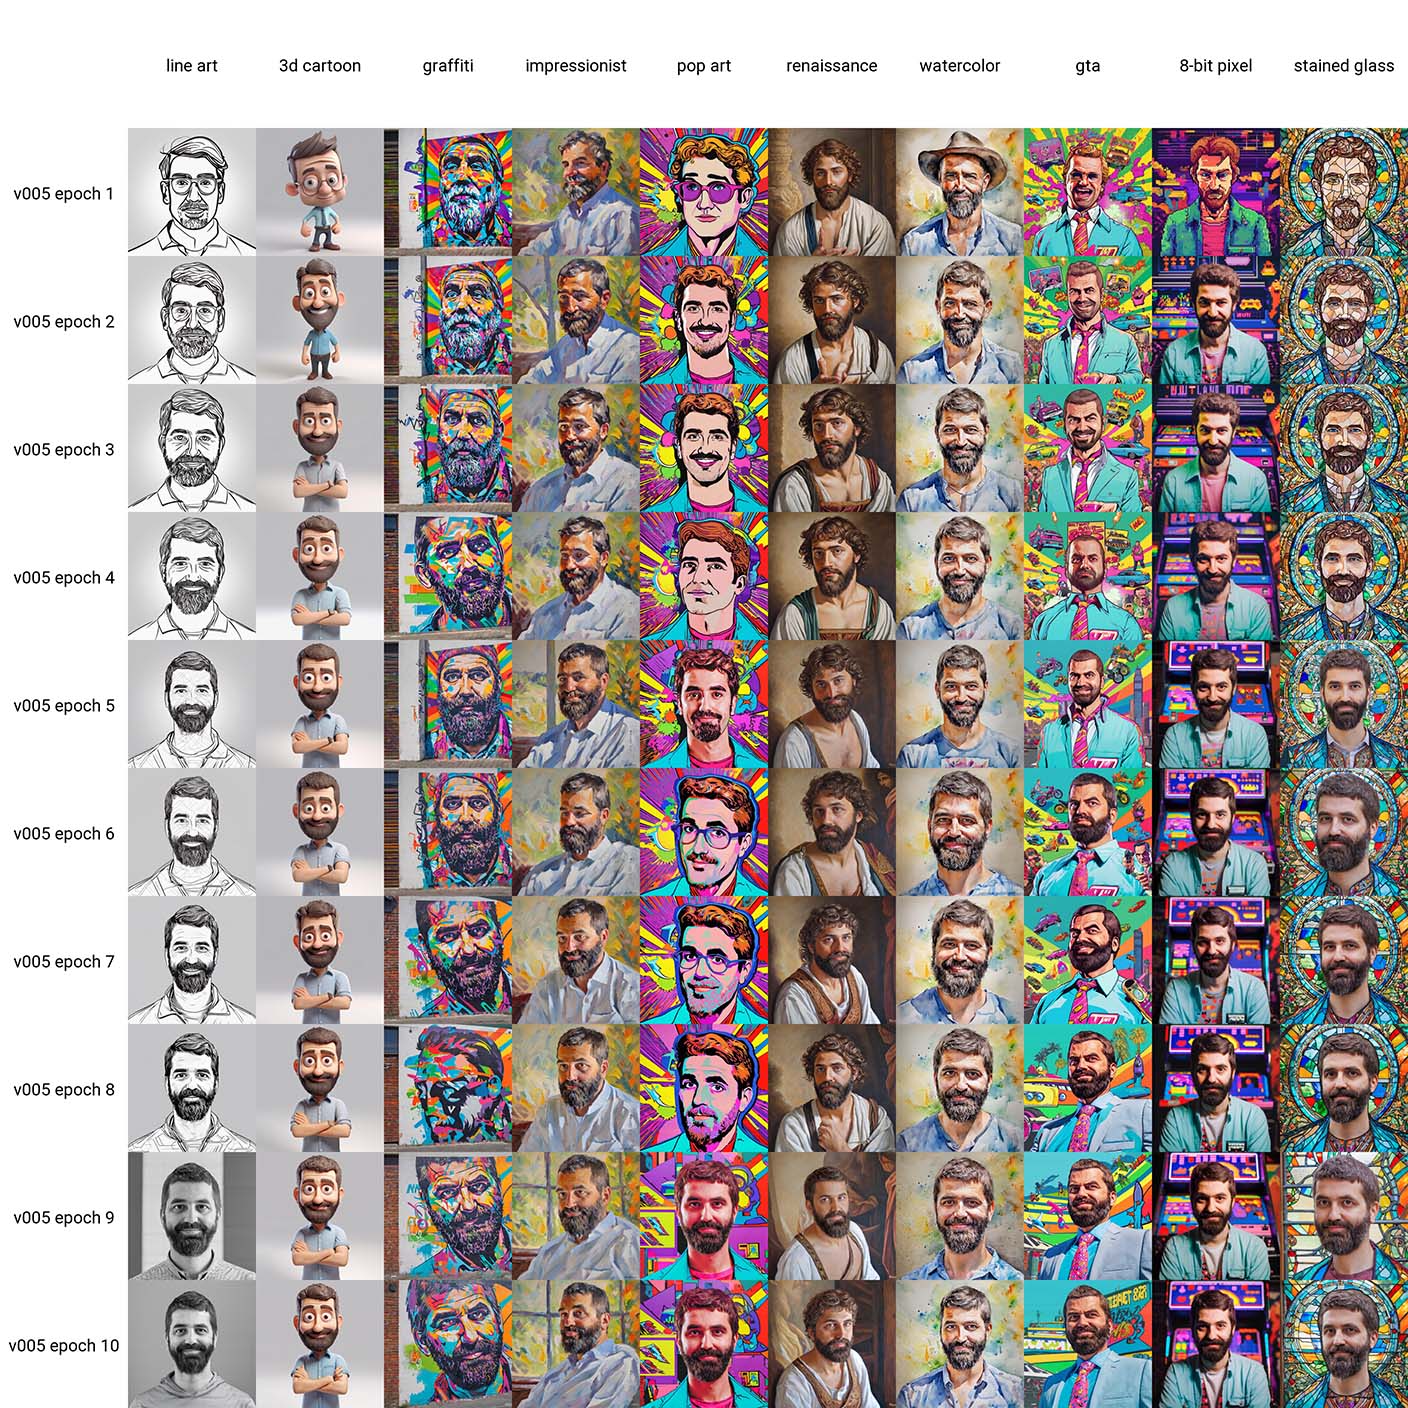
Styles 005
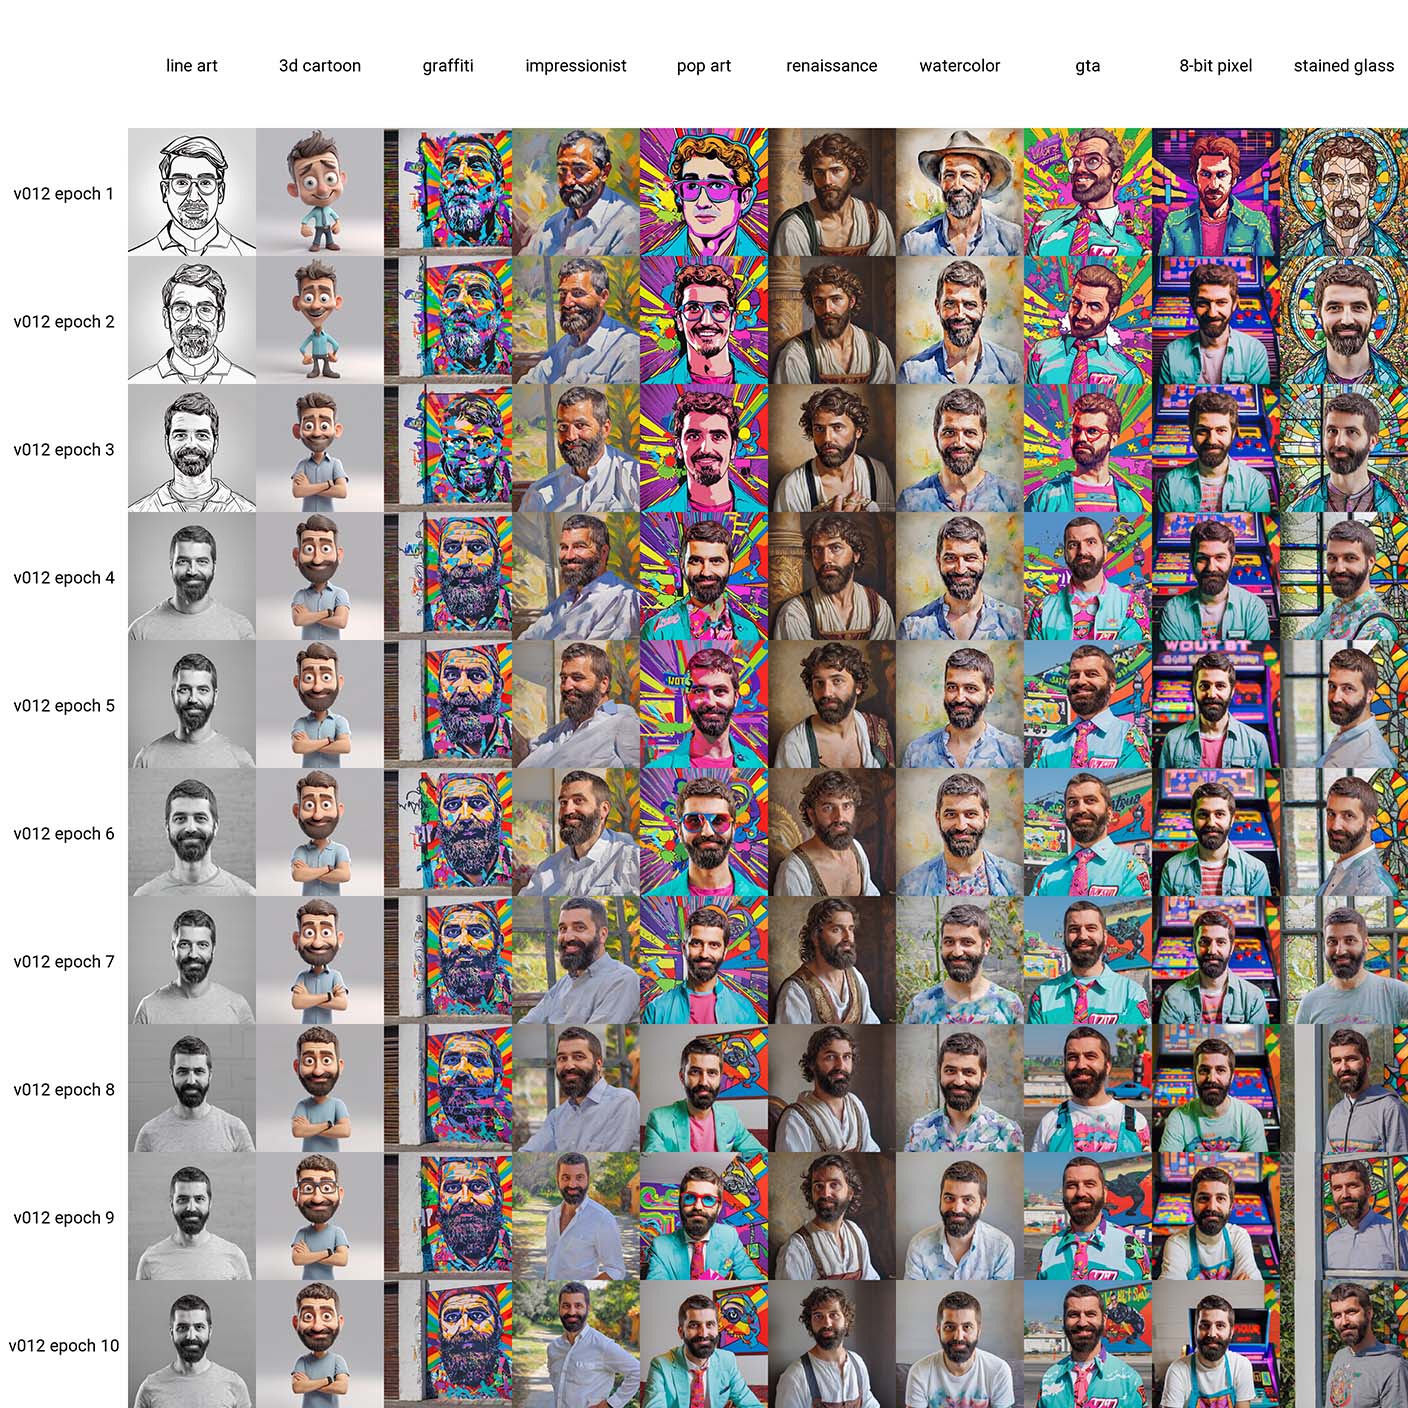
Style v012
Conclusions

General
- The highest chance of success, is with input captions.
- If I don’t care about leaking into the main class, don’t bother with regularization images. The Lora is most flexible at that point
- The only way my special keyword
w0ut3rdidn’t leak, is when I generated high-quality regularization images using the same captions (without the keyword) as the input images.
That’s all folks
I hope this post gave you some insights in what approaches you can take to training your own subject Lora using Dreambooth. That being said, I’m not an expert in this field, and I’m sure there are other ways to get good results. If you have any questions, feel free to leave a comment below.